SamFS - the Storage Archive Manager FileSystem
Introduction
Okay, this is tutorial isn’t really about feature of Solaris itself. But the feature of this tutorial it’s deeply coupled with Solaris. Thus you can view it as an optional part of Solaris. This time I will dig into the installation and configuration of SamFS. But a warning, SamFS is a feature monster. This tutorial is equivalent to put your toes in the Atlantic ocean, but when I saw the announcement of the open-sourcing of SamFS I thought, it’s time to write this document. In addition to that, it was a nice way to make a reality check on a thought game, I’ve made some months ago.
The theory of Hierarchical Storage Management
I think, I should start with the theory of Hierarchical Storage Management(HSM). The technology of managing data and their position on different media isn’t really a widespread feature for most administrators. Thus this introduction will be a quite long one.
First Observation: Data access pattern
There is a single fact in data management, that was true the last 40 years and it will be true until we won’t store data anymore. The longer you didn’t access data, the lesser the probability of an access gets. This matches with daily observation: You work on a text document, you access it every few minutes, you finalize your work and store it on your hard disk. And the microsquaremeters of rotating rust with your document rotate with it. Perhaps you access it a few times in the next weeks to print it again. But after a year it get more and more improbable, that you will access the data. The problems: 1. Murphy«s Law: A nanosecond can be defined as the time between the time of deletion of a file and the moment the boss comes into your office wanting the document. 2. In most countries you will find regulations who prohibits the deletion of a file.
Second observation: The price of storage
When you look at the prices for storage, you will see that the price of it will rise with its speed. An enterprise-class 15k rpm FC drive is an expensive device. An enterprise-class 7.2k rpm SATA disk is much cheaper but you can’t operate it 24h near of its full load. A LTO4 tape can store 800 GB for 60-70 Euro, whereas even a cheap consumer disk with 750 GB costs round about 100 Euro. The disadvantage: It takes quite a time to get the first byte. You have to load it, wind it into the drive, wind it to the correct position.
Third observation: Capacity
This observation is so simple and so obvious, I won’t have to explain it: The amount of data to store never gets smaller. When I remember my first PC, purchased by my dad, it had an 20 Megabyte harddisk. And I thought: Thats pretty much. Today, I need this capacity to store 2 raw images from my DSLR. And in company it’s the same. Independently from the provided space, it isn’t enough. I know some companies where small amounts of free space on a departmental server is a subject of interdepartment quid-pro-quo deals.
Hierarchical Storage Management
The basic idea of hierarchical storage management leverages these observations. It makes sense to store actual data on the fastest storage available, but it doesn’t make sense to use it for data, that didn’t have accessed for a year or so. The other way round: It will drive you mad, if actual your text document is stored on a DLT-Tape in a big autoloader, needing 2 minutes to stream the first byte to the client.
Hierarchical Storage Management can use a multitude of storage devices with different access behavior to store your data. You can establish an hierarchy of storage systems. You can use ultra fast FC disks for data in regular usage, cheaper SATA disks for files you need a few times a week, tapes for data needed a few times a year. The kicker behind HSM: The inner workings of HSM are invisible for the user or the application. You just use the file, and the system gathers it from other media.
An analogy in computer hardware
Most of you already use hierarchical mechanism for storing data. It’s the hierarchy of memory in your computer. You have ultrafast memory in your processor called registers, then you have an almost as fast memory called cache (most of the time you have several stages like Level 1 to 3 Caches), then you have a much slower main memory. At the end you have the swap space on your harddisk, much slower again than the main memory. HSM does the same for storage.
The advantages and the challenges are pretty much the same: By using the hierarchy in an intelligent manner, you can speed up the access to your data without spending to much for buying only the fastest memory. The challenge: You have to find a way to find the best place for your data, and you have to carefully size the amount of the stages. When it’s to small, access times get longer, as you have to access a slower storage/memory.
SamFS
SamFS is an implementation of this concept. It isn’t the only one, but from my view it’s the best implementation in the unix world. SamFS stands for Storage Archive Manager File Ssystem. It’s an fully POSIX compliant file system, thus an user or an application won’t see a different to an UFS for example, with a rich feature set. I would suggest, that you look at the Sun Website for the Sun StorageTek SamFS website for an overview.
The jargon of SamFS
As usual, this technology has its own jargon. Thus I will start to define the most important words at first.
Lifecycle
Before defining the jargon, it’s important to understand, that every file under the control of SamFS follows a certain lifecycle. You create or modify it, the system archives it, after a certain time without an access the system removes it from expensive storage, when it has copies on cheaper ones, when you access it, it will be gathered from the cheaper storage and delivered to you. When you delete it, you have to remove it from all your medias. This cycle is endless until a file is deleted.
Policies
Albeit every file is under the control of the described cycle, the exact life of a file doesn«t have to be the same for every file. SamFS knows the concept of policies to describe the way, SamFS should handle a file. How many copies should SamFS make of a file on which media. The most difficult task of configuring SamFS is to find a most adequate policy. You need experience for it, but it’s something that you can easily learn on the job.
Archiving
Okay, the first step is archiving. Let’s assume you’ve created a file. The data gets stored into the SamFS filesystem. Okay, but you’ve defined a policy, that you want two copies on a tape media. The process that does this job is called archiver, the process itself is called archiving. Archiving moves your files to the desired media. The metadata of the files is augmented with the positions of the file. SamFS can create up to 4 copies of a file. Important to know: SamFS doesn’t wait with the archiving process until it needs space on the cache media. It starts the process of archiving files with the next run of the archive (for example every 5 minutes)
Releasing
Okay, let’s assume you filesystem is 90% full. You need some space to work. Without SamFS you would move around the data manually. SamFS works similar and differently at the same time. The archiver already moved your data to different places. Thus releasing is the process to delete the data from your filesystem. But it doesn’t delete all of it. It keeps a stub of it in the filesystem. This process is called releasing. The metadata (filename, acl, ownership, rights, and the start of the file) stays on disk. Thus you won’t see a difference. You can walk around in your directories and you will see all your files. The difference: The data itself isn’t in the filesystem anymore, thus it don’t consume space in it.
Staging
Okay, after long time (the file was already released) you want to access the data. You go into the filesystem, and open this file. SamFS intercepts this call, and automatically gathers the data from the archive media. In the meantime the reads from this file will be blocked, thus the process accessing the data blocks, too. SamFS uses informations from the metadata to find the media.
Recycling
Okay, the end of the lifetime of a file is its deletion. That’s easy for disks. But you can’t delete a single file from tape in an efficient manner. Thus SamFS uses a different method: The data on the tape is just marked as invalid, the stub gets deleted. But the data stays on tape. After a while more and more data may get deleted from tape. This may end in a swiss cheese where only a small amount of data is actual data. This would be waste of tape and the access pattern gets slower and slower. Recycling solves this by a single trick. The residual active data gets a special marker. When the archiver runs the next time, the data gets archived again. Now there is no actual data left on the tape. You can erase it by writing a new label to it and you can use it for new data again. This process is called recycling.
The circle of life
Okay, with this jargon we can draw a picture of this processes.
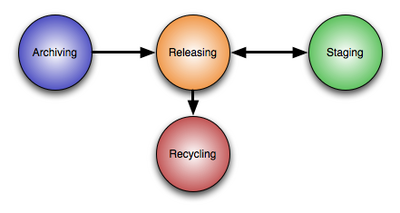
Once a file gets newly written or updated, it gets archived. Based on a combination policies, usage and the caching strategy it’s possible it’s getting released and staged again and again. And at the end, the tape with the data will be recycled.
Watermarks
Watermarks are an additional, but very important concept in SamFS. The cache is much smaller than the filesystem . Nevertheless you have to provide space for new and updated data. So SamFS implements two important watermarks: Then the cache gets filled to the high watermark, the system starts to release the least recently used files with a minimum number of copies on archive media automatically. This process stops, when the low water mark is reached. Thus you can ensure that you have at least a certain amount of free capacity to store new or updated data in the filesystem.
The SamFS filesystem: Archive media
When used in conjunction with the Archiver/Stager/Releaser construct, the SamFS filesystem itself isn’t much more than a cache for all the data you store in this filesystem. Not the size of the SamFS filesystem is decisive for the size of your file system, the amount of archive media is the limitation of the size. For example. With a 1 GB disk cache and 10 petabyte of T10000 tapes, you can store up to 5 petabyte of data. Why 5 petabyte? Well, it’s a best practice to store two copies of every file on your system, just in case a tape gets lost or damaged.
Archive media can be of different nature:
-
disk drives
-
other SamFS Servers
-
tapes (with or without autoloading)
-
magneto optical disks (with or without autoloading)
The media doesn’t even have to be in reach of an autoloader. SamFS knows the concept of offlined archive media, for example tapes in a safe. When you try to access data on an offlined media, the accessing process blocks and the admin is notified to move its a.. to put the tape into a drive.
Installation of SamFS
It’s quite easy to install SamFS. It’s just installing two packages and answering some questions.
Obtaining the binaries
At first, you have to download the iso image with the binaries for SamFS 4.6. You can obtain them at the Sun Download Center. You need an account for the download center, but you can register for free. At the moment you are allowed to test it for 60 days, but you don’t need to obtain a test license as there is no license enforcement in the software. Instead of this, this is handled with right-to-use licensing.
Installing the SamFS packages
Let’s start the installation of SamFS:
# cd sunstorageteksam-fs4.6/
# cd x64
# cd 2.10
# pkgadd -d . SUNWsamfsr SUNWsamfsu</b>

Processing package instance <SUNWsamfsr> from </cdrom/sunstorageteksam-fs4.6/x64/2.10>

Sun SAM and Sun SAM-QFS software Solaris 10 (root)(i386) 4.6.5,REV=5.10.2007.03.12

        Sun SAMFS - Storage & Archiving Management File System

        Copyright (c) 2007 Sun Microsystems, Inc.

        All Rights Reserved.


       -----------------------------------------------------

In order to install SUNWsamfsr, you must accept the terms of
the Sun License Agreement.
Enter "y" if you do, "n" if you don't, or "v" to view agreement. y

- The administrator commands will be executable by root only (group bin).

If this is the desired value, enter "y".  If you want to change
the specified value enter "c". y

By default, elrond is not setup to be remotely managed by
File System Manager. It can only be managed by the File System
Manager if it is installed locally
You can modify the remote management configuration at a later time
using the command fsmadm

If you want to keep the default behavior, enter "y". Otherwise enter "n". y
## Processing package information.
## Processing system information.
   20 package pathnames are already properly installed.
## Verifying disk space requirements.
## Checking for conflicts with packages already installed.

The following files are already installed on the system and are being
used by another package:
  /etc/opt <attribute change only>
  /var/opt <attribute change only>

Do you want to install these conflicting files [y,n,?,q] y
## Checking for setuid/setgid programs.

This package contains scripts which will be executed with super-user
permission during the process of installing this package.

Do you want to continue with the installation of <SUNWsamfsr> [y,n,?] y

Installing Sun SAM and Sun SAM-QFS software Solaris 10 (root) as <SUNWsamfsr>

## Executing preinstall script.


## Installing part 1 of 1.
/etc/fs/samfs/mount
[...]
/var/svc/manifest/application/management/fsmgmt.xml
[ verifying class <none> ]
/opt/SUNWsamfs/sbin/samcmd <linked pathname>
## Executing postinstall script.

The administrator commands are executable by root only.

------------------------------------------------------------
-                   PLEASE READ NOW !!!                    -
------------------------------------------------------------

If you are upgrading from a previous release of SAM and
have not read the README file delivered with this release,
please do so before continuing.  There were significant
restructuring changes made to the system from previous
releases. Failure to convert scripts to conform to these
changes could cause dramatic changes in script behavior.


Installation of <SUNWsamfsr> was successful.

Processing package instance <SUNWsamfsu> from </cdrom/sunstorageteksam-fs4.6/x64/2.10>

Sun SAM and Sun SAM-QFS software Solaris 10 (usr)(i386) 4.6.5,REV=5.10.2007.03.12

        Sun SAMFS - Storage & Archiving Management File System

        Copyright (c) 2007 Sun Microsystems, Inc.

        All Rights Reserved.

## Executing checkinstall script.
## Processing package information.
## Processing system information.
   10 package pathnames are already properly installed.
## Verifying package dependencies.
## Verifying disk space requirements.
## Checking for conflicts with packages already installed.
## Checking for setuid/setgid programs.

This package contains scripts which will be executed with super-user
permission during the process of installing this package.

Do you want to continue with the installation of <SUNWsamfsu> [y,n,?] y

Installing Sun SAM and Sun SAM-QFS software Solaris 10 (usr) as <SUNWsamfsu>

## Installing part 1 of 1.
/opt/SUNWsamfs/lib/amd64/libsamconf.so <symbolic link>
[...]
/usr/sfw/bin/tapealert_trap
[ verifying class <none> ]
## Executing postinstall script.

Configuring samst devices.  Please wait, this may take a while.

Adding samst driver
Building samst devices
Issuing /usr/sbin/devfsadm -i samst >> /tmp/SAM_install.log 2>&1

Adding samioc driver

Adding samaio driver

File System Manager daemon is configured to auto-restart every time the daemon dies

Starting File System Manager daemon


Please check the log files for any errors
that were detected during startup

Installation of <SUNWsamfsu> was successful.
Installing the SamFS Filesystem Manager
Now we install the FilesystemManager:
# cd /cdrom/sunstorageteksam-fs4.6/
# cd x64
# ./fsmgr_setup </b>

Unzipping File System Manager files...
This process may take a while ...
Start cleaning up to prepare for new software installation
Start installing File System Manager packages...
This process may take a while ...

Processing package instance <SUNWfsmgrr> from </tmp/File_System_Manager/2.10/i386>

File System Manager Solaris 10 (root)(i386) 3.0.4,REV=5.10.2007.03.01
## Executing checkinstall script.

        Sun SAMFS - Storage & Archiving Management File System

        Copyright (c) 2007 Sun Microsystems, Inc.

        All Rights Reserved.

## Processing package information.
## Processing system information.
   1 package pathname is already properly installed.
## Verifying package dependencies.
## Verifying disk space requirements.

Installing File System Manager Solaris 10 (root) as <SUNWfsmgrr>

## Executing preinstall script.
Shutting down Sun Java(TM) Web Console Version 3.0.3 ...
The console is stopped
## Installing part 1 of 1.
/opt/SUNWfsmgr/bin/fsmgr
[...]
/opt/SUNWfsmgr/samqfsui/xsl/svg/storagetier.xsl
[ verifying class <none> ]
## Executing postinstall script.
Extracting online help system files...Archive:  en_samqfsuihelp.zip
   creating: en/help/
[...]
  inflating: en/help/stopwords.cfg
done

    Warning: smreg is obsolete and is preserved only for
    compatibility with legacy console applications. Use wcadmin instead.

    Type "man wcadmin" or "wcadmin --help" for more information.


    Registering fsmgrAdmin_3.0.


    Warning: smreg is obsolete and is preserved only for
    compatibility with legacy console applications. Use wcadmin instead.

    Type "man wcadmin" or "wcadmin --help" for more information.

    Registering /opt/SUNWfsmgr/samqfsui/WEB-INF/lib/fsmgmtjni.jar
    as fsmgmtjni.jar for scope fsmgrAdmin_3.0

    Enabling logging...

    Warning: smreg is obsolete and is preserved only for
    compatibility with legacy console applications. Use wcadmin instead.

    Type "man wcadmin" or "wcadmin --help" for more information.


Installation of <SUNWfsmgrr> was successful.

Processing package instance <SUNWfsmgru> from </tmp/File_System_Manager/2.10/i386>

File System Manager Solaris 10 (usr)(i386) 3.0.4,REV=5.10.2007.03.01
## Executing checkinstall script.

        Sun SAMFS - Storage & Archiving Management File System

        Copyright (c) 2007 Sun Microsystems, Inc.

        All Rights Reserved.

## Processing package information.
## Processing system information.
   2 package pathnames are already properly installed.
## Verifying package dependencies.
## Verifying disk space requirements.

Installing File System Manager Solaris 10 (usr) as <SUNWfsmgru>

## Installing part 1 of 1.
/usr/lib/libfsmgmtjni.so
/usr/lib/libfsmgmtrpc.so
[ verifying class <none> ]
## Executing postinstall script.
Current session timeout value is 15 minutes, change to 60 minutes...Set 1 properties for the console application.
done
Starting Sun Java(TM) Web Console Version 3.0.3 ...
The console is running
Appending elrond into /var/log/webconsole/host.conf ...done!

Installation of <SUNWfsmgru> was successful.
Done installing File System Manager packages.


Backing up /etc/security/auth_attr to /etc/security/auth_attr.old
Start editing /etc/security/auth_attr ...
Done editing /etc/security/auth_attr

Backing up /etc/user_attr to /etc/user_attr.old
Start editing /etc/user_attr ...
Start editing /etc/user_attr ...
Done editing /etc/user_attr
File System Manager 3.0 and its supporting application
is installed successfully.


******************* PLEASE READ **********************************

Please telnet to each Sun StorEdge(TM) QFS servers to be
managed and run the following command:

    /opt/SUNWsamfs/sbin/fsmadm status


This will determine if the File System Manager daemon is running.

If it is not running, please run the following command:

    /opt/SUNWsamfs/sbin/fsmadm config -a


This command will start the File System Manager daemon that communicates with
the File System Manager. Failure to do so will prevent File System Manager
from communicating with the Sun StorEdge QFS servers.

Remote access to the servers used by the File System Manager is now
restricted based on host name or IP address.  If you are managing
a Sun StorEdge(TM) QFS Server from a remote management station,
please telnet to the server and run the following command:

    /opt/SUNWsamfs/sbin/fsmadm add <management_station_host_name>.<domain>
Press ENTER to continue ...

File System Manager 3.0 supports the following browsers:

  Browser Type                          Operating System
  ========================================================================
  Netscape 7.1/Mozilla 1.7/Firefox 1.5  Solaris OS,
                                        MS Windows 98SE, ME, 2000, and XP
  Internet Explorer 6.0                 MS Windows 98SE, ME, 2000, and XP

Now launch your web browser and type the following URL:
     https://<hostname>.<domain>:6789

where <hostname> is the host that you have just installed the
File System Manager.

If you are served with a security related certificate, go ahead and
accept it.  Please see user docs for username and password details.


It is required to clear the browser cache before accessing the
File System Manager for the first time.  Failure to do so may cause
unexpected behavior in various pages.


File System Manager 3.0 has been tested with the
Sun Java(TM) Web Console version 2.2.5 & 3.0.2.
Installing this product with any older Sun Java(TM) Web Console version breaks both
applications. This product may work on newer Sun Java(TM) Web Console
versions, but this has not been tested.

*****************************************************************


Install/Uninstall log file named /var/tmp/fsmgr.setup.log.03.23.2008.11:01 is created.
Modifying the profile
You have to extend the profile to for additional search paths for binaries and man pages.
PATH=$PATH:/opt/SUNWsamfs/bin:/opt/SUNWsamfs/sbin
MANPATH=$MANPATH:/opt/SUNWsamfs/man
export PATH MANPATH
That’s all about the installation of SamFS.
The first Sam filesystem
Okay, now we can configure our first filesystem with SamFS.
Prerequisites
Before we can configure SamFS, I want to describe the prerequisites for this task: We need some harddisks for this task. I made my example a little bit more complex, thus I used iSCSI volumes for this task.
I created for this tutorial:
-
a 64 MB emulated volume for the storage of metadata
-
a 512 MB emulated volume for the filesystem itself
-
a 2 GB emulated volumes to use them as archive disks
I assume that you already know the tasks to creating them from the iSCSI tutorial.
The first and the second volume will be used by SamFS directly. You have to use the format command to put a label and a partition table on it.
For the both archive volumes, we will use ZFS. Thus I’ve created a zpool for both:
# zpool create samfs_archive_1 c1t0100001C42E9F21A00002A0047E54035d0
# zpool create samfs_archive_2 c1t0100001C42E9F21A00002A0047E54036d0
The configuration itself
Okay, let’s start to create a filesystem. We have to tell SamFS the structure of our filesystem. This is done in the file /etc/opt/SUNWsamfs/mcf.
samfs1             10    ma   samfs1  -
/dev/dsk/c1t0100001C42E9F21A00002A0047E6642Bd0s0  11    mm   samfs1  -
/dev/dsk/c1t0100001C42E9F21A00002A0047E54033d0s0  12    md   samfs1  -
Okay, let’s dissect this file. At first I want to explain the general meaning of the columns.
-
The first column of this file is the equipment identifier. This field serves multiple purposes. You define filesystems, tape drives, disk partitions for the cache or tape robotics in this file. Please note: You do not define media for disk archiving here!
-
The second column is the equipment ordinal. This field enumerates every component defined in the
mcffile. This number has to be unique. -
The third column is the equipment type. SamFS supports a vast amount of device type. You define it by using its shorthand here.
mastands for a SamFS/QFS cache disk set with one or more dedicated metadevices.mofor example designates an 5 1/4 inch erasable optical drive. -
The forth column is the family set. With the family set name you group devices. For example all disks of a filesystem. All disks of a filesystem have the same name. Another example is the grouping of a tape robotic and all of its tape drive
-
The fifth column is the device state.
Okay, what did we describe with our mcf file: We defined an filesystem with the name samfs1. The name of the family set is samfs1 as well. The filesystem is of the type "SamFS disk cache with dedicated metadevices. In the next row we’ve defined that the device /dev/dsk/c1t0100001C42E9F21A00002A0047E6642Bd0s0 is a device solely for metadata. We gave it the ordinal number 11 and it’s part of the samfs family, thus a part of the filesystem defined before. The third line configures the /dev/dsk/c1t0100001C42E9F21A00002A0047E54033d0s0 as the data disk for this filesystem (as the family name is samfs1 as well.
Yes, you have read it correctly. SamFS is capable to separating the metadata and the data of the files on different disks. The idea behind this concept is to use fast disks for the metadata (e.g. solid state disks) with short access times and slower disks for the data. By this separation the filesystem has doesn’t have to step between the position of the metadata and the position of the data when it’s updated. The effect: Much better scaling when you use a large amount of disks.
Okay, now we have fully configured the filesystem. Now we modify the /etc/vfstab to enable simpler mounting/auto mounting at start.
The device name is the name of the filesystem, in your case samfs1. It don’t have a raw device. The mountpoint is /samfs1, the type samfs and we want to mount it at the start. The options are SamFS specific. They mean: Start to release files (thus freeing space in the cache) when the cache is 80 percent full. Release until the cache is filled only 60 percent.
samfs1 - /samfs1 samfs - yes high=80,low=60
Okay, we have to tell SamFS that there is a new configuration:
bash-3.00# samd config
Configuring SAM-FS
bash-3.00#
Looks good. Now we are able to format the filesystem:
# sammkfs samfs1
Building 'samfs1' will destroy the contents of devices:
                /dev/dsk/c1t0100001C42E9F21A00002A0047E6642Bd0s0
                /dev/dsk/c1t0100001C42E9F21A00002A0047E54033d0s0
Do you wish to continue? [y/N]y
total data kilobytes       = 520192
total data kilobytes free  = 520128
total meta kilobytes       = 61440
total meta kilobytes free  = 61024
Let’s try to mount it.
# mkdir /samfs1
# mount /samfs1
# cd /samfs1
You should see the obligatory lost+found now. But let’s do an deeper check of the filesystem:
bash-3.00# samfsinfo samfs1
samfsinfo: filesystem samfs1 is mounted.
name:     samfs1       version:     2
time:     Sun Mar 23 15:46:40 CET 2008
count:    2
capacity:      000000000007f000          DAU:         64
space:         0000000000070c40
meta capacity: 000000000000f000          meta DAU:    16
meta space:    000000000000aa80
ord  eq           capacity              space   device
  0  11   000000000000f000   000000000000aa80   /dev/dsk/c1t0100001C42E9F21A00002A0047E6642Bd0s0
  1  12   000000000007f000   000000000007efc0   /dev/dsk/c1t0100001C42E9F21A00002A0047E54033d0s0
Et voila, your first SamFS filesystem.
Using disk archiving
Okay, we will use the simplest case of archiving. It’s disk archiving. In this configuration SamFS doesn’t use a tape drive for storing data, it simply uses filesystems, or to be more precise, it uses a directory in a filesystem to store its data.
Prerequisites
Okay, I’ve created two iSCSI-base diskpool at the start to use them as disk archives. Now I will put some further separation in them by creating directories in it.
# mkdir /samfs_archive_1/dir1
# mkdir /samfs_archive_1/dir2
# mkdir /samfs_archive_2/dir2
# mkdir /samfs_archive_2/dir1
Configuring the archiver
So, we have to start to configure the archive medias. Every archive media has its VSN. VSN is a shorthand for Volume Serial Name. The VSN identifies a media of your archive. In this case we assign the VSN disk01 with the directory /samfs_archive_1/dir1/
disk01  /samfs_archive_1/dir1/
disk02  /samfs_archive_1/dir2/
disk03  /samfs_archive_2/dir1/
disk04  /samfs_archive_2/dir2/
Now we have usable devices for archiving. But have to configure the archiving as the next step. In this step we define the policies for archiving, control the behavior of he archiver and associate VSNs with archive sets. All this configuration takes place in the file /etc/opt/SUNWsamfs/archiver.cmd.
Okay, lets create such a config file for our environment.
logfile = /var/opt/SUNWsamfs/archiver/log
interval = 2m
Okay, this is easy: The archiver should log its work into the file /var/opt/SUNWsamfs/archiver/log. This file is really interesting. I will show you a nifty trick with it later in this tutorial.
The interval directive was responsible for defining the interval between the starts of a process for finding new or updated files (sam-arfind). This behavior didn’t scaled very well with millions of files in a directory.
Today the default is different. The file system itself knows what files have been updated and SamFS stores this information in a list. Today this setting has a similar effect, but with other methods: It’s the default setting for the archive aging. It defines the amount of time between the first file added to the todo list for the archiver and the start of the archive. Thus the archiving would start two minutes after adding the first file to the list.
Now we define the archiving policy for the filesystem:
fs = samfs1
arset0 .
      1 30s
      2 1200s
What does this mean? arset0 is a name of a so called archive set. The contents of this set are defined later-on. The . stands for "every file in the filesystem". Okay, now we tell SamFS to make a first copy to the archiveset arset0.1 after 30 seconds. The second copy is made to the archiveset arset0.1 after 1200 seconds (20 minutes). We have just used the name of some archive sets, now we have to declare them:
vsns
arset0.1 dk disk01
arset0.2 dk disk03
samfs1.1 dk disk02
endvsns
Okay, The translation is quite simple: The archiveset arset0.1 consists is a disk based set and consists out of the VSN disk01. The same for the archive set arset0.2. But wait, we didn’t used an archiveset samfs1.1 so far. Well, you haven’t defined it explicitly. But it’s implicit when you have an archiver configuration for an filesystem. It’s the default archive set. You can use it for regular archiving, but as we haven’t defined a policy to do so, this archive set is used for storing the meta data of your filesystem. So the association of a VSN to this archive set is mandatory.
So we end up with the following archiver.cmd
logfile = /var/opt/SUNWsamfs/archiver/log
interval = 2m

fs = samfs1
arset0 .
      1 30s
      2 1200s

vsns
arset0.1 dk disk01
arset0.2 dk disk03
samfs1.1 dk disk02
endvsns
Okay, we’ve finalized our configuration: Now we have to check the configuration:
bash-3.00# archiver -lv
Reading '/etc/opt/SUNWsamfs/archiver.cmd'.
1: logfile = /var/opt/SUNWsamfs/archiver/log
2: interval = 2m
3:
4: fs = samfs1
5: arset0 .
6:       1 30s
7:       2 1200s
8:
9: vsns
10: arset0.1 dk disk01
11: arset0.2 dk disk03
12: samfs1.1 dk disk02
13: endvsns
No media available for default assignment
Notify file: /etc/opt/SUNWsamfs/scripts/archiver.sh
Read timeout: 60
Request timeout: 15m
Stage timeout: 15m

Archive media:
media:dk bufsize: 4 archmax:  512.0M Write timeout: 15m

Archive libraries:
Device: disk archive_drives: 3
  Dictionary:
  dk.disk01               capacity:    2.0G space:    1.9G
  dk.disk02               capacity:    2.0G space:    1.9G
  dk.disk03               capacity:    2.0G space:    1.9G
  dk.disk04               capacity:    0    space:    0


Archive file selections:
Filesystem samfs1  Examine: noscan  Interval: 2m
  archivemeta: on  scanlistsquash: off  setarchdone: off
  Logfile: /var/opt/SUNWsamfs/archiver/log
samfs1   Metadata
  copy: 1  arch_age: 4m
arset0   path: .
  copy: 1  arch_age: 30
  copy: 2  arch_age: 20m


Archive sets:
[...]

arset0.1
  media: dk
 Volumes:
   disk01 (/samfs_archive_1/dir1/)
 Total space available:    1.9G

arset0.2
  media: dk
 Volumes:
   disk03 (/samfs_archive_2/dir1/)
 Total space available:    1.9G

samfs1.1
  media: dk
 Volumes:
   disk02 (/samfs_archive_1/dir2/)
 Total space available:    1.9G
bash-3.00#
Now we tell SamFS to reread its config-files
bash-3.00# samd config
Configuring SAM-FS
bash-3.00#
And now we have a running archiver. So ... let’s have some fun with it. Copy some files in it. I tend do test it by making a recursive copy of the /var/sadm/pkg directory. Now let’s look onto our archival disks:
bash-3.00# ls -l /samfs_archive_1/dir1
total 40734
-rw-------   1 root     root          56 Mar 23 19:39 diskvols.seqnum
-rw-------   1 root     root     19608576 Mar 23 17:43 f0
-rw-------   1 root     root     1049088 Mar 23 19:39 f1
bash-3.00# ls -l /samfs_archive_1/dir2
total 13593
-rw-------   1 root     root          56 Mar 23 19:42 diskvols.seqnum
-rw-------   1 root     root     6891520 Mar 23 17:42 f0
-rw-------   1 root     root        4608 Mar 23 19:42 f1
bash-3.00# ls -l /samfs_archive_2/dir1
total 40736
-rw-------   1 root     root          56 Mar 23 19:58 diskvols.seqnum
-rw-------   1 root     root     19608576 Mar 23 17:43 f0
-rw-------   1 root     root     1049088 Mar 23 19:58 f1
You see, your archival media starts to populate. But where are your files, and what’s up with this f1. Well, they are written in a very specific, very secret and very closed format: These files are simple tar files. SamFS uses the standard tar format to write the archive file.You can look in it with the standard tar or the tar of SamFS:
bash-3.00# star tfv f1
-rw------T root/root   1048576 2008-03-23 19:28 testfile3
Please notice, that this isn’t a version of Joerg Schilling’s star despite of the name.
Working with SamFS
Now we’ve configured a file system and we set up the archiver for it. Now let’s use it.
Looking up SamFS specific metadata
At first let’s create a test file.
# mkfile 10m /samfs1/testfile3
We now look at the metadata of this file. There is a special version of ls that is capable to read the additional information. This version ls is called sls. So let’s check for our test file.
[root@elrond:/samfs1]$ sls -D testfile3
testfile3:
  mode: -rw------T  links:   1  owner: root      group: root
  length:   1048576  admin id:      0  inode:     4640.1
  access:      Mar 23 19:28  modification: Mar 23 19:28
  changed:     Mar 23 19:28  attributes:   Mar 23 19:28
  creation:    Mar 23 19:28  residence:    Mar 23 19:28
There is nothing new. Okay, let’s leave the computer alone, drink a coffee or two, and now we check again:
bash-3.00# sls -D testfile3
testfile3:
  mode: -rw------T  links:   1  owner: root      group: root
  length:   1048576  admin id:      0  inode:     4640.1
  archdone;
  copy 1: ----- Mar 23 19:39         1.1    dk disk01 f1
  copy 2: ----- Mar 23 19:58         1.1    dk disk03 f1
  access:      Mar 23 19:28  modification: Mar 23 19:28
  changed:     Mar 23 19:28  attributes:   Mar 23 19:28
  creation:    Mar 23 19:28  residence:    Mar 23 19:28
I assume you’ve already noticed the three additional lines. The archiver did its job:
  archdone;
  copy 1: ----- Mar 23 19:39         1.1    dk disk01 f1
  copy 2: ----- Mar 23 19:58         1.1    dk disk03 f1
The first line says, that all outstanding archiving for the file is done. The two next lines tells you where the copies are located, when they were archived and tells you about some special flags. The 1.1 means first file in the archive file , starting at the 513th bit of the archive file(the header of tar if 512 byte long, thus the 513th bit is the first usable byte, thus the 1)
Manually forcing the release
Normally a file just get released, when the high watermark is reached or you configured the archiving this way. But you can force the release on the command line.
After this step, the file isn’t in the cache any longer. When we look in the metadata, we will the a new information. The file is in the offline state:
bash-3.00# sls -D testfile3
testfile3:
  mode: -rw------T  links:   1  owner: root      group: root
  length:   1048576  admin id:      0  inode:     4640.1
  offline;  archdone;
  copy 1: ----- Mar 23 19:39         1.1    dk disk01 f1
  copy 2: ----- Mar 23 19:58         1.1    dk disk03 f1
  access:      Mar 23 19:28  modification: Mar 23 19:28
  changed:     Mar 23 19:28  attributes:   Mar 23 19:28
  creation:    Mar 23 19:28  residence:    Mar 24 01:28
When we access it again, the file get’s staged back to the cache again:
bash-3.00# cat testfile3
bash-3.00# sls -D testfile3
testfile3:
  mode: -rw------T  links:   1  owner: root      group: root
  length:   1048576  admin id:      0  inode:     4640.1
  archdone;
  copy 1: ----- Mar 23 19:39         1.1    dk disk01 f1
  copy 2: ----- Mar 23 19:58         1.1    dk disk03 f1
  access:      Mar 24 01:35  modification: Mar 23 19:28
  changed:     Mar 23 19:28  attributes:   Mar 23 19:28
  creation:    Mar 23 19:28  residence:    Mar 24 01:35
The offline flag has gone away.
Manually forcing the staging of a file
Okay, but you can force the staging as well, let’s assume you’ve released a file.
bash-3.00# release testfile3
bash-3.00# sls -D testfile3
testfile3:
  mode: -rw------T  links:   1  owner: root      group: root
  length:   1048576  admin id:      0  inode:     4640.1
  offline;  archdone;
  copy 1: ----- Mar 23 19:39         1.1    dk disk01 f1
  copy 2: ----- Mar 23 19:58         1.1    dk disk03 f1
  access:      Mar 24 01:35  modification: Mar 23 19:28
  changed:     Mar 23 19:28  attributes:   Mar 23 19:28
  creation:    Mar 23 19:28  residence:    Mar 24 01:37
A colleague comes into your office, and tells you that he wants to use a large file with simulation data tomorrow. It would be nice, if he don’t have to wait for the automatic staging. We can force SamFS to get the file back to the cache.
bash-3.00# stage testfile3
Okay, let’s check for the status of the file:
bash-3.00# sls -D testfile3
testfile3:
  mode: -rw------T  links:   1  owner: root      group: root
  length:   1048576  admin id:      0  inode:     4640.1
  archdone;
  copy 1: ----- Mar 23 19:39         1.1    dk disk01 f1
  copy 2: ----- Mar 23 19:58         1.1    dk disk03 f1
  access:      Mar 24 01:35  modification: Mar 23 19:28
  changed:     Mar 23 19:28  attributes:   Mar 23 19:28
  creation:    Mar 23 19:28  residence:    Mar 24 01:37
Voila, it’s in the cache again.
Usecases and future directions
Okay, after all this configuration. How can you use it? Well, the most obvious usage of SamFS is Archiving. And many customers use it for exactly this task: Archiving audio, archiving video, archiving eMails, documents, xrays, satellite images, simulation data, data of large experimental system. Everything that’s worth to be stored for a long long time. That’s the job, it was designed for.
Unconventional Usecases
But there are more unconventional use cases. One example: What does a backup software for network use? The ones with a central server and a backup agent? For example for Oracle? Well, the client not really much more than triggering RMAN and transmitting it over the network. The server receives it and stores it into tape. The problem with it? Well, did you recently look into the price list for such an backup agent?
Now think about the following idea: With SamFS you already have something, that controls your tape. everything written to a SamFS filesystem will be written to tape, if you configure it this way. Share this filesystem via NFS. Now you just have to write your RMAN script to backup your data into this NFS filesystem. No backup client involved. By the way, as the backup is written to the cache at first, you don’t have the problem of keeping the tape streaming at top speed (the start/stop problem is mostly something of the past, as most drives are capable of changing their speed in discrete steps to adapt the speed of incoming data. Of course you won’t use the full speed and the TB/hour capacity of the device). When you completed a backup file, SamFS will write it at full speed of the tape drive to the tape.
The interesting point about SamFS: Once you think about it, about the concept of hierarchical Storage Management, about a filesystem with tapes in its background, you will find more and more interesting use cases for it.
Future directions and ideas
SamFS is a tool that is in active development at Sun, albeit we work on the integration of SamFS like features into ZFS. More interesting will be the hardware side of this system. I’ve used iSCSI based volumes in my example. Just think about this scenario if I didn’t used two 2G volumes but X4500 with 48 TB. Within 2 Racks I could archive almost 1 Petabyte with medium speed disks. (By the way: I’ve used the ZFS for the diskvols: Thus the transmission of the data to the network and the storage of the data itself is secured by checksums. ZFS Crypto will go beta soon, so you could can create an archive system where no data is unencrypted.) Using such large disk systems for archival is certainly a future direction.
But there is still a need for tapes: Aircraft manufactures have to store their data for 99 years (as far as I know). A normal German company has to store their data for 10 years for our IRS equivalent called Finanzamt. You don’t want to store it on rotating rust for this amount of time. But by intelligent policies, you don’t have to hassle around with it manually.
Conclusion
Okay, this was a rather long tutorial and I didn’t even talked about the configuration of tape devices. As I told you before: Only the toes in the Atlantic ocean. But I hope, I gave you some insight into a somewhat unconventional topic and a capability of an optional part the Solaris Operating Environment. I assume, with the opensourcing of SamFS we will see a much more widespread use of it.
Do you want to learn more?
Reading the documentation is even more important than for the other features I presented in this series:
Documentation
docs.sun.com: Sun StorageTek Storage Archive Manager Installation and Upgrade Guide[^41]
docs.sun.com: Sun StorageTek SAM File System Configuration and Administration Guide[^42]
docs.sun.com: Sun StorageTek SAM Archive Configuration and Administration Guide[^43]
Misc. information
Sun Whitepaper: Sun StorEdge QFS and SAM-FS Software[^44]