Point-in-Time Copy with the Availability Suite
Introduction
The basic idea of Point-in-Time copies is the idea to freeze the contents of a disk or a volume at a certain time, thus other processes can work on data of a certain point in time, while your application works on the original dataset and changes it.
Why is this important? Let’s assume you want to make a backup. The problem is quite simple. When a backup takes longer than a few moments, the files backup first my represent an different state of the system than the files backup last. You backup is inconsistent, as you’ve done a backup of a moving target. Okay, you could simply freeze your application, copy its data to another disk (via cp or dd) and backup it from there or backup it directly and restart your application, but most of the time, this isn’t feasible. Let’s assume you have a multi-terabyte database on your system. A simple copy can take quite a time, in this time your application doesn’t work (at least when you database has no backup mode).
Okay, simple copy is to ineffective. We have to do it with other methods. This tutorial will show you the usage of a method integrated into OpenSolaris and Solaris.
Basics
One of this methods is the usage of the point in time copy functionality of the Availability Suite. I’ve wrote about another function of AVS not long ago when I wrote the tutorial about remote replication. Point-in-time-copy and remote replication are somewhat similar (you detect and record changes and transmit those to a different disk, albeit the procedures are different). Thus it was quite logical to implement both in the AVS.
Availability Suite
The AVS is a Suite consisting out of two important parts: The "Remote Replication" functionality and the "Point-in-time Copy" functionality. Regular readers of this blog will remember the remote replication as I’ve already written a tutorial about it. The Availability Suite is integrated to Solaris Express Community and Developer Edition. You can use it for free. It’s available for Solaris as well, but when you want support for it, you have to buy the product, as it’s a add-on product for Solaris 10
The jargon of Point in Time Copies with AVS
Okay, as every technology the mechanisms of Point-in-time copies have their own jargon and I will use it quite regularly in this tutorials.
- Master volume:
-
The master volume is the source of the point in time copy. This is the original dataset
- Shadow volume:
-
The shadow volume is the volume, which contains the point in time copy
- Virtual shadow volume:
-
There are certain methods to establish a point in time copy, that copies only the original data in the case the data is changed on the master volume. But such a shadow volume is incomplete, as the unchanged parts are missing on the shadow volume . For this the virtual shadow volume was introduced.
The idea is simple, but effective. Whenever a block wasn’t changed since the last sync of your point-in-time copy, the data is delivered by the master volume. When the block has changed, the data is delivered by the shadow volume. This is transparent to the user or the application, as this virtual shadow volume is created by the AVS point-in-time copy drivers. You access this virtual shadow volume simply by using the name of the shadow volume, even albeit the volume doesn’t contain all the needed data.
- Bitmap volume:
-
All this mechanisms need a logbook about all the changes made to the master volume. This job is done by bitmap volume. Whenever a block on the disk is changed, AVS marks this in the bitmap volume. The bitmap volume is used at several occasions. By using the bitmap volume it can efficiently sync the master and the shadow volume, you can construct the virtual shadow volume with it in an efficient way.
All types of volumes can be placed on real disk or volumes represented by Veritas Volume Manager or Solaris Volume Manager.
Types of copies
Point-in-time Copy in AVS supports three types of copies:
-
independent copies
-
dependent copies
-
compact independent copies
All three have a basic idea. Using a bitmap to track changes and using it generate a point-in-time copy. But the methods behind it are quite different. In the next three parts of this tutorial I will dig deeper into this methods.
Independent copy
The most important point about independent copies are in their name. The point in time copy is an independent copy of your original data. You can use it on its own and the copy doesn’t need the original data to work.
This method is quite similar of doing a copy with dd or cp. At first a full copy is done by the PiT functionality. Now you’ve created the first point in time copy. But now the advantages of tracking the changes in a database come in to the game. Whenever data on the master is changed, the system tracks this in the bitmap volume. At the next resync of the shadow with the master, the system only copies the changed blocks to the shadow. This vastly reduces the time for the update
Deeper dive
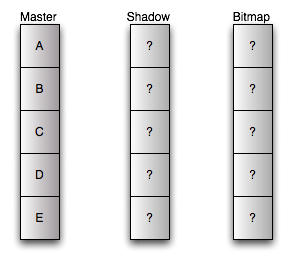
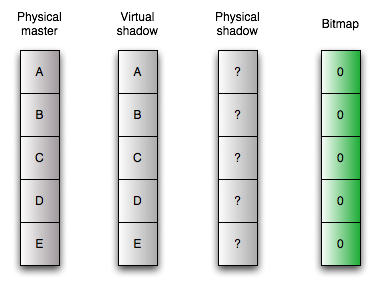
At first you have your master volume. It’s the volume with your data. Before configuration of point-in-time copy both shadow and bitmap copy are uninitialized. We use some special manufactured disks for tutorial purposes. They have only five blocks. :)
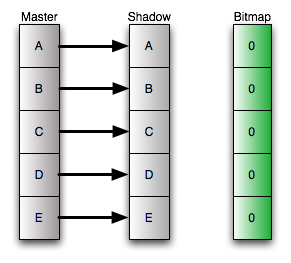
When you’ve configured the independent copy, a full sync takes place. Each block is copied from the master volume to the shadow volume, and the bitmap volume is initialized. At the end of this process master and shadow are identical and the bitmap is in the "clean" state. No differences between the both. There is one important fact: After the initial copy, the bitmap doesn’t have to be clean. During the full sync the independent copy behaves like a dependent copy. This is done to enable you to use the master volume directly after initiating the independent copy. So, when you change the master volume during the full sync, you will have a "dirty" bitmap (I will explain this condition in a few moments).
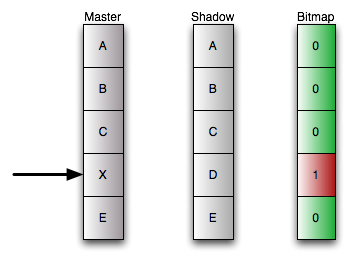
Okay, now we change the fourth block of the disk. As the old data is already on the shadow volume, we don’t have to move any data. But we log in the bitmap volume, that a block has changed, the block is "dirty". From now the bitmap is in the "dirty" state. The dirty state tells us, that there are differences between the master and the shadow volume.
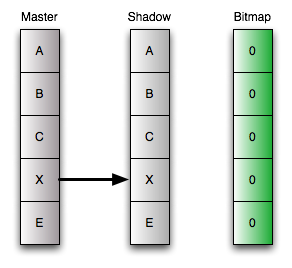
Okay, we don’t need to move data, why do we need the bitmap volume. The bitmap volume makes the synchronization of master and shadow much more efficient. With the bitmap volume you known the position of changed blocks. So when you resync your shadow with the shadow you just have to copy this blocks, and not the whole disk. After copying the block, the adjacent bit in the bitmap is set to zero, the system known that the synced block on master and shadow are identical again.
Advantages and Disadvantages
This has some interesting advantages: You can export this disks in your SAN and use it from a different server. For example you can mount it on a backup server, thus you don’t need to transport all the traffic across you local area network.
But there are some disadvantages. You have a high initial amount of data to sync and the size of the master and the shadow have to be equal. This isn’t much a problem of the time needed for the sync (because of the fact, that it behaves as a dependent copy) but it poses more load to CPU and I/O system to copy all the data.
Dependent Copy
The mechanism of dependent copies was introduce to get rid of this initial sync, as there are circumstances where this initial copy would pose to much load to the system.
The dependent copy uses the bitmap a little bit different. The shadow disk doesn’t contain all the data, it just contains the changed data. The bitmap is used to keep track of the block on the masters which have a copy on the shadow.
<h4>Deeper dive
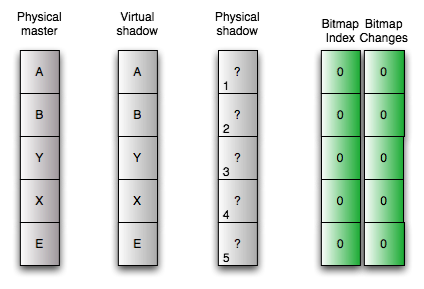
The dependent copy is one of the two mechanisms in AVS using the concept of the virtual shadow. Thus the model is a little more complex. Let’s assume you create an dependent copy. The initialization is simple. You move no data. You just initialize the bitmap volume. When an user or application access the virtual shadow volume, it checks in the bitmap if the blocks has changed. If the bitmap signals no change, it just delivers the original block of the master volume.
When you change some data on the master volume, AVS starts to copy data. It copies the original content of the block onto the physical shadow volume at the same logical position in the volume. This is the reason, why master and shadow volumes have to have the same size when using dependent copies. Furthermore AVS logs in the bitmap that there is data on the shadow volumes, the block is dirty in the bitmap. When you access the virtual shadow volume now, the bitmap is checked again. But for blocks declared dirty in the bitmap, the data is delivered from the copy on the physical shadow volume, for all other "clean" blocks the data comes from the master volume.

Resyncing the shadow to the master is easy. Just reinitializing the bitmap. Now all data comes from the master volume again, until you change some data on it.

Advantages and Disadvantages
The advantage of this method is its short time of initialization and syncing from master to the shadow. It’s virtually zero. But you lose the advantages of the independent copy. The dependent copy can only used in conjunction with the original data. This has two main effects. You can’t export the copied volume to a different server and you can’t use is as an copy for disaster recovery when your master volume has failed.
Furthermore the master and the slave volume still have to be the same size. But the next method for making an point-in-time copy was derived from the dependent copy exactly to circumvent this problem.
Compact dependent copy
The compact dependent copy is similar to the normal dependent copy. But this dog knows an additional trick: The shadow and the master doesn’t have to be at the same size.
Like the dependent copy this methods uses the concept of the virtual shadow volume. So the bitmap is really important. The bitmap of the compact dependent copy tracks the changes. This exactly as with the normal dependent snapshots. But the bitmap for compact dependent snapshots is enabled to store an important additional information. It’s enabled to track, where the system has written the changed data blocks on the shadow volume. So you don’t have to write it at the same logical position, you can write it at any position on your shadow volume and it can retrieve the old data with this information.
Deeper dive
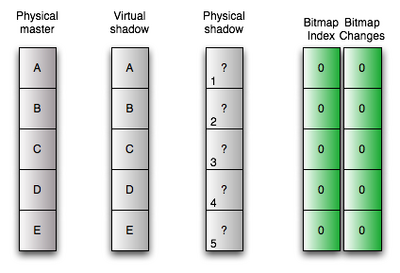
Okay, at start this picture looks pretty much the same like its counterpart at the normal dependent snapshots. Please note, the additional information on the bitmap volume. To make the compact dependent copy we just initialize the bitmap to its "clean" state.
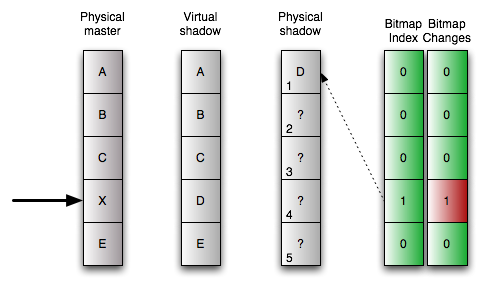
Let’s assume that we change the fourth block on our disk. As with the normal copy, the block is declared as dirty. But now starts to work differently. The original data of the master volume is stored to the first free block on the physical shadow volume. In addition to that the position is stored at the bitmap.
The way to read from the shadow volume changes accordingly. When the bitmap signals, that a block is clean, it just passed the data from the master volume to the user or application. When the bitmap signals a dirty, thus changed block, it reads the position of the block on the physical shadow volume from the bitmap, reads the block from there and delivers it to the application or user.
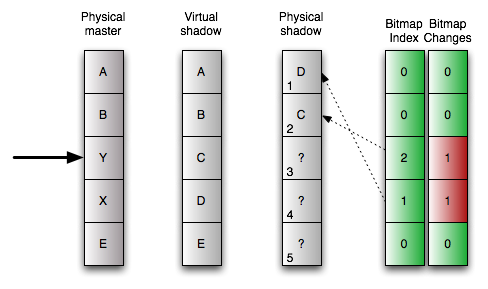
When we change the next block, for example the third one, the same procedure starts. The original data is stored to the next free block, now the second one, on the physical shadow volume and this position is stored in the bitmap together with the dirty state of the block.
Okay, resyncing the shadow with the master is easy again. Just initializing the bitmap.
Advantages and Disadvantages
The trick of storing the position with the dirty state has an big advantage. You don’t need master and shadow volumes with the same size. When you know, that only a small percentage of blocks change between two point in time copies, you can size the shadow volume much smaller, thus saving space on your disk. In my opinion compact dependent copies are the only reasonable way to go when you want more than one copy of your master volume. The disadvantages ares pretty much the same of the normal dependent copies.
Preparation of the test environment
After all this theory, I will go into more practical stuff. In the following parts of this tutorial I will give you an introduction to point-in-time copies with AVS. But at first we have to prepare some things.
At first: We need only one system for this example, so we don’t need any networking configuration. Furthermore you need to assume the root role to do the configuration in this example.
Disklayout
Okay, I will use two harddisks in my example: /dev/dsk/c1d00 and /dev/dsk/c1d1. I’ve chosen the following layout for the disk.
.                         First     Sector    Last
. Partition  Tag  Flags    Sector     Count    Sector  Mount Directory
       2      5    01          0  65480940  65480939
       3      0    00      48195    273105    321299
       4      0    00     321300     80325    401624
       5      0    00     401625    273105    674729
       6      0    00     674730     80325    755054
       8      1    01          0     16065     16064
       9      9    00      16065     32130     48194
With this configuration I have two 128 mb sized slices. I will use them for data in my example. Additionally I’ve create two 32 mb small slices for the bitmaps. 32 mb for the bitmaps is too large, but I didn’t wanted to calculate the exact size.
Calculation of the bitmap volume size for independent and dependent shadows
You can calculate the size for the bitmap size as follows: \(Size_\text{Bitmapvolume in kB}=24+(Size_\text{Datavolume in GB}*8)\) Let’s assume a 10 GB volume for Data: \(Size_\text{Bitmapvolume in kB}=24+(10*8)\) \(Size_\text{Bitmapvolume in kB}=104kb\)
Calculation of the bitmap volume size for compact dependent shadows
You can calculate the size for the bitmap size as follows: \(Size_\text{Bitmapvolume in kB}=24+(Size_\text{Datavolume in GB}*256)\) Let’s assume a 10 GB volume for Data: \(Size_\text{Bitmapvolume in kB}=24+(10*256)\) \(Size_\text{Bitmapvolume in kB}=2584kb\)
Preparing the disks
It’s important to have exactly the same layout on the second disk, at least, when you use independent or non-compact dependent copies. Okay, to be more precise, the slices under the control of the point-in-time copy functionality has to have the same size. To simplify the fulfillment of this requirement, I copy the layout from my master disk to the shadow disk.
# prtvtoc /dev/dsk/c1d0s2 | fmthard -s - /dev/rdsk/c1d1s2
fmthard:  New volume table of contents now in place.
Okay, now let’s create a file system for testing purposes on the master disk.
# newfs /dev/dsk/c1d0s3
newfs: construct a new file system /dev/rdsk/c1d0s3: (y/n)? y
Warning: 3376 sector(s) in last cylinder unallocated
/dev/rdsk/c1d0s3:       273104 sectors in 45 cylinders of 48 tracks, 128 sectors
        133.4MB in 4 cyl groups (13 c/g, 39.00MB/g, 18624 i/g)
super-block backups (for fsck -F ufs -o b=#) at:
 32, 80032, 160032, 240032
Okay, as an empty filesystem is a boring target for point-in-time copies, we play around a little bit and create some files in our new filesystem.
# mount /dev/dsk/c1d0s3 /mnt
# cd /mnt
# mkfile 1k test1
# mkfile 1k test2
# mkfile 1k test3
# mkfile 1k test4
# mkfile 1k testindex1
# ls -l
total 26
drwx------   2 root     root        8192 Apr 25 18:10 lost+found
-rw------T   1 root     root        1024 Apr 25 18:10 test1
-rw------T   1 root     root        1024 Apr 25 18:11 test2
-rw------T   1 root     root        1024 Apr 25 18:11 test3
-rw------T   1 root     root        1024 Apr 25 18:11 test4
-rw------T   1 root     root        1024 Apr 25 18:11 testindex1
Okay, that’s all ... now let’s try point-in-time copies.
Starting a Point-in-time copy
Okay, before using the merits of point-in-time copies, we have to configure such copies. The configuration of this copies is done with the with the iiadm command. In this part of the tutorial I will show you how to configure the different kinds of point-in-time copies.
Common prerequisite
At first we have to enable the Availability suite. This is independent from the method of doing the point-in-time copy. When you’ve used the AVS before, you don’t need this step
# dscfgadm
Could not find a valid local configuration database.
Initializing local configuration database...
Successfully initialized local configuration database

If you would like to start using the Availability Suite immediately, you may
start the SMF services now.  You may also choose to start the services later
using the dscfgadm -e command.

Would you like to start the services now?  [y,n,?] y
Please answer the last question with y . By doing so, all the services of the AVS we need in the following tutorial are started (besides the remote replication service)
Create an independent copy
Now we can configure the point in time copy. This is really simple.
# iiadm -e ind /dev/rdsk/c1d0s3 /dev/rdsk/c1d1s3 /dev/rdsk/c1d1s4
That’s all. What does this command mean: Create an independent copy of the data on the slice /dev/rdsk/c1d0s3 on /dev/rdsk/c1d1s3 and use /dev/rdsk/c1d1s3 for the bitmap. As soon as you execute this command, the copy process starts. We decided to use an independent copy, thus we start a full copy of the master volume to the shadow volume. As long this fully copy hasn’t completed, the point-in-time copy behaves like an dependent copy. Now we check the configuration.
# iiadm -i
/dev/rdsk/c1d0s3: (master volume)
/dev/rdsk/c1d1s3: (shadow volume)
/dev/rdsk/c1d1s4: (bitmap volume)
Independent copy
Latest modified time: Fri Apr 25 18:16:59 2008
Volume size:   273105
Shadow chunks total: 4267 Shadow chunks used: 0
Percent of bitmap set: 0
        (bitmap clean)
The highlighted part is interesting. The bitmap is clean. This means, that there are no changes between the master and the shadow volume.
Create an independent copy
Creating an dependent copy is quite easy,too . You have just alter the command a little bit, you’ve used to create independent one.
# iiadm -e dep /dev/rdsk/c1d0s3 /dev/rdsk/c1d1s3 /dev/rdsk/c1d1s4
Just substitute the ind with the dep and you get a dependent copy.
# iiadm -i
/dev/rdsk/c1d0s3: (master volume)
/dev/rdsk/c1d1s3: (shadow volume)
/dev/rdsk/c1d1s4: (bitmap volume)
Dependent copy
Latest modified time: Sat Apr 26 23:50:19 2008
Volume size:   273105
Shadow chunks total: 4267 Shadow chunks used: 0
Percent of bitmap set: 0
        (bitmap clean)
Create an compact independent copy
How do you get a compact dependent copy? Well, there is no command to force the creation of such a copy. But it’s quite easy to get one. When the shadow volume is smaller than the master volume, the system chooses the compact independent copy automatically. We’ve created two small slices, when we formatted the harddrive. One of the small slices is /dev/rdsk/c1d1s6. Let’s use it as the shadow volume. This volume has only a size 32 MB while the master volume is 256 MB large.At first we create an dependent copy again, but with different volumes:
# iiadm -e dep /dev/rdsk/c1d0s3 /dev/rdsk/c1d1s6 /dev/rdsk/c1d1s4
Now let’s check the status of the point-in-time copy configuration:
# iiadm -i
/dev/rdsk/c1d0s3: (master volume)
/dev/rdsk/c1d1s6: (shadow volume)
/dev/rdsk/c1d1s4: (bitmap volume)
Dependent copy, compacted shadow space
Latest modified time: Sat Apr 26 23:55:05 2008
Volume size:   273105
Shadow chunks total: 1255 Shadow chunks used: 0
Percent of bitmap set: 0
        (bitmap clean)
Et voila, you’ve configured a compact dependent copy.
Working with point-in-time copies
We’ve created the point-in-time-copy in the last part of the tutorial, but this is only one half of the story. In this part, we will use the this feature for backup purposes. The procedures are independent from the chosen point-in-time copy mechanism.
Okay, let’s play around with our point-in time copy. At first we check the filesystem on our master volume mounted at /mnt. Nothing has changed. The AVS doesn’t touch the master volume. But now let’s create some files.
# ls
lost+found  test1       test2       test3       test4       testindex1
# touch test5
# touch test6
# mkfile 2k testindex2
We check our dependent copy again:
# iiadm -i
/dev/rdsk/c1d0s3: (master volume)
/dev/rdsk/c1d1s3: (shadow volume)
/dev/rdsk/c1d1s4: (bitmap volume)
Independent copy
Latest modified time: Fri Apr 25 18:16:59 2008
Volume size:   273105
Shadow chunks total: 4267 Shadow chunks used: 0
Percent of bitmap set: 0
        (bitmap dirty)
Please look at the highlighted part. The system detected the changes to the master volume and marked the changed block on the bitmap volumes. The bitmap is "dirty" now.
Okay, now let’s use our copy. We create a mountpoint and mount our shadow volume at this mountpoint.
# mkdir /backup
# mount /dev/rdsk/c1d1s3 /backup
Just for comparison, we have a short look at our master volume again:
# cd /mnt
# ls
lost+found  test2       test4       test6       testindex2
test1       test3       test5       testindex1
Now we check our copy:
# cd /backup
# ls
lost+found  test1       test2       test3       test4       testindex1
We see the state of the filesystem at the moment we’ve created the point-in-time copy. Please notice the difference. The files created after initiating the copy are not present in the shadow.
You can make everything you want with the filesystem on the shadow volume. You can even write to it. But for this tutorial, we will make a backup from it. Whatever happens with the master volume during this backup, the data on the shadow won’t change. Okay, that’s isn’t so interesting for a few bytes, but important for multi-terabyte databases or filesystems.
# tar cfv /backup20080424.tar /backup
a /backup/ 0K
a /backup/lost+found/ 0K
a /backup/test1 1K
a /backup/test2 1K
a /backup/test3 1K
a /backup/test4 1K
a /backup/testindex1 1K
As you see, no test5, test6 or testindex2. Okay, we have made our backup, now let’s sync our copy.
# iiadm -u s /dev/rdsk/c1d1s3
That’s all. What have we done. We told the AVS to update the shadow copy on /dev/c1d1s3. Whenever you specify a disk or volume directly, you use the name of the shadow volume. A master volume can have several shadow volumes, but there can be only one shadow on a volume. So the copy configuration can be specified with the shadow volume. The -u s tells AVS to do an update (not a full copy) to the slave (from the master). Okay, now let’s check the copy again.
# iiadm -i
/dev/rdsk/c1d0s3: (master volume)
/dev/rdsk/c1d1s3: (shadow volume)
/dev/rdsk/c1d1s4: (bitmap volume)
Independent copy
Latest modified time: Fri Apr 25 19:30:19 2008
Volume size:   273105
Shadow chunks total: 4267 Shadow chunks used: 0
Percent of bitmap set: 0
        (bitmap clean)
Please look at the highlighted part again. The bitmap is clean again. The master and the shadow are in sync.
Okay, let’s check it by mounting the filesystem.
# mount /dev/dsk/c1d1s3 /backup
# cd /backup
# ls -l
total 30
drwx------   2 root     root        8192 Apr 25 18:10 lost+found
-rw------T   1 root     root        1024 Apr 25 18:10 test1
-rw------T   1 root     root        1024 Apr 25 18:11 test2
-rw------T   1 root     root        1024 Apr 25 18:11 test3
-rw------T   1 root     root        1024 Apr 25 18:11 test4
-rw-r--r--   1 root     root           0 Apr 25 18:20 test5
-rw-r--r--   1 root     root           0 Apr 25 18:20 test6
-rw------T   1 root     root        1024 Apr 25 18:11 testindex1
-rw------T   1 root     root        2048 Apr 25 18:20 testindex2
It’s the exact copy of the filesystem in the moment when you’ve initiated the copy.
Okay, now let’s play again with our point-in-time copy. Let’s create some files in our master volume:
# cd /mnt
# touch test7
# touch test8
# mkfile 3k testindex2
Please note, that I’ve overwritten the 2k sized version of testindex2 with a 3k sized version. A quick check of the directories:
# ls /mnt
lost+found  test2       test4       test6       test8       testindex2
test1       test3       test5       test7       testindex1
# ls /backup
lost+found  test2       test4       test6       testindex2
test1       test3       test5       testindex1
Okay, the directory are different. Now let’s start the backup again.
# tar cfv backup20080425.tar /backup
a /backup/ 0K
a /backup/lost+found/ 0K
a /backup/test1 1K
a /backup/test2 1K
a /backup/test3 1K
a /backup/test4 1K
a /backup/testindex1 1K
a /backup/test5 0K
a /backup/test6 0K
a /backup/testindex2 2K
Okay, test7 and test8 didn’t made it into the tarball, as they were created after updating the point-in-time copy. Furthermore we’ve tared the 2k version of testindex2 not the 3k version. So you can backup a stable version of your filesystem, even when you modify your master volume during the backup.
Okay, now we can unmount the filesystem again.
# cd /
# umount /backup
After this we sync the slave volume with the master volume.
# iiadm -u s /dev/rdsk/c1d1s3
And when we compare the filesystems, they are identical again.
# mount /dev/dsk/c1d1s3 /backup
# ls /mnt
lost+found  test2       test4       test6       test8       testindex2
test1       test3       test5       test7       testindex1
# ls /backup
lost+found  test2       test4       test6       test8       testindex2
test1       test3       test5       test7       testindex1
You can play this game forever, but I will stop now, before it gets boring.
Disaster Recovery with Point-in-time copies
The process of syncing master and shadow is bidirectional. You can’t not only update the shadow from the master, you can update the master from the shadow as well. This is a really neat feature for disaster recovery.
Let’s assume, you tried a new version of your software. At first all is well, but a minute later the system is toast. Later you will find out, that there was a race condition in the new code, that only manifested on your production system. But you don’t know this now. And to add insult to injury, your face go white after looking into the directory.
# ls -l /mnt/testindex*
-rw-r--r--   1 root     root           0 Apr 25 19:40 /mnt/testindex1
-rw-r--r--   1 root     root           0 Apr 25 19:41 /mnt/testindex2
The new code killed your <code>testindex</code>-files. Zero bytes. And you hear the angry guy or lady from customer support shouting your name. But you were cautious, you’ve created a point-in-time copy before updating the system.
So, calm down and recover before a customer support lynch mob reach your office with forks and torches. Leave the filesystem and unmount it.
# cd /
# umount /mnt
Now sync the master with the slave. Yes, the other way round.
# iiadm -u m /dev/rdsk/c1d1s3
Overwrite master with shadow volume? yes/no yes
Okay ... after a few moments the shell prompt appears again. Now you can mount it again.
# mount /dev/dsk/c1d0s3 /mnt
# cd /mnt
Let’s check our work and check the <code>testindex</code> files.
# ls -l /mnt/testindex*
-rw------T   1 root     root        1024 Apr 25 18:11 /mnt/testindex1
-rw------T   1 root     root        3072 Apr 25 19:33 /mnt/testindex2
Phew ... rescued ... and the lynch mob in front of your office throws the torches out of the window, directly on the car of the CEO (of course by accident ;) )
Administration
Okay, there are several administrative procedures with the point-in-time copy functionality. I will describe only the most important ones, as I don’t want to substitute the manal with this tutorial.
Deleting a point-in-time copy configuration
Okay, let’s assume you used the following configuration so far:
# iiadm -l
dep /dev/rdsk/c1d0s3 /dev/rdsk/c1d1s6 /dev/rdsk/c1d1s4
It’s really easy to delete this config. As I mentioned before, the name of the shadow volume clearly indicates a point-in-time copy configuration, as there can be only one configuration for any given shadow volume. So you use the name of the shadow volume to designate a configuration. Thus the command to delete the configuration is fairly simple:
# iiadm -d /dev/rdsk/c1d1s6
The -d tells iiadm to delete the config. When we recheck the current AVS configuration, the config for /dev/rdsk/c1d1s6 is gone:
# iiadm -l
#
Forcing a full copy resync of a point-in-time copy
Whenever you are in doubt of the consistency of you point-in-time copy (flaky disks, you’ve swapped a disk) it may be sensible to force a full copy resync instead of coping only the changed parts. Le«ts assume the following config of an independent copy:
# iiadm -l
ind /dev/rdsk/c1d0s3 /dev/rdsk/c1d1s3 /dev/rdsk/c1d1s4
Again you use the name of the shadow volume to designate the configuration. You force the full copy resync with a single command:
# iiadm -c s /dev/rdsk/c1d1s3
When we check the status of the dependent copy, you will see that a full copy is in progress:
# iiadm -i
/dev/rdsk/c1d0s3: (master volume)
/dev/rdsk/c1d1s3: (shadow volume)
/dev/rdsk/c1d1s4: (bitmap volume)
Independent copy, copy in progress, copying master to shadow
Latest modified time: Sun Apr 27 01:49:21 2008
Volume size:   273105
Shadow chunks total: 4267 Shadow chunks used: 0
Percent of bitmap set: 69
        (bitmap dirty)
Let’s wait for a few moments and check the status again:
# iiadm -i
/dev/rdsk/c1d0s3: (master volume)
/dev/rdsk/c1d1s3: (shadow volume)
/dev/rdsk/c1d1s4: (bitmap volume)
Independent copy
Latest modified time: Sun Apr 27 01:49:21 2008
Volume size:   273105
Shadow chunks total: 4267 Shadow chunks used: 0
Percent of bitmap set: 0
       (bitmap clean)
The full copy resync has completed.
Grouping point-in-time copies
Sometimes the data of an application is distributed over several disks. For example because you application is rather old can use only volumes sized at 2 Gigabytes each. When you want to make a consistent point-in-time copy of all volumes, you have to do it at the same time. To enable the admin to do so, you can group point-in-time copies. When you use the groupname, all members of the group get the commands at the same time.
Okay, let’s assume we have an independent copy so far.
# iiadm -l
ind /dev/rdsk/c1d0s3 /dev/rdsk/c1d1s3 /dev/rdsk/c1d1s4
Now we want to configure another one for the volume /dev/rdsk/c1d0s5 with /dev/rdsk/c1d1s5 as the shadow volume and /dev/rdsk/c1d1s6 as the bitmap volume.
At first we move the existing configuration into a group. I will name it database in my example but you could choose any other name for it.
# iiadm -g database -m /dev/rdsk/c1d1s3
With -g we designate the groupname and with -m we move the volume into the group. As usual we use the name of the shadow volume to designate the configuration.
Now we create the point-in-time copy of the second volume. But we will create it directly in the group. To do so, we need the -g switch.
# iiadm -g database -e dep /dev/rdsk/c1d0s5 /dev/rdsk/c1d1s5 /dev/rdsk/c1d1s6
Please notice, that we used a different copy mechanism for the point-in-time copy. The don’t have to be identical in the group.
Let’s check the state of our copies:
# iiadm -i
/dev/rdsk/c1d0s3: (master volume)
/dev/rdsk/c1d1s3: (shadow volume)
/dev/rdsk/c1d1s4: (bitmap volume)
Group name: database
Independent copy
Latest modified time: Sun Apr 27 01:49:21 2008
Volume size:   273105
Shadow chunks total: 4267 Shadow chunks used: 0
Percent of bitmap set: 0
        (bitmap clean)
------------------------------------------------------------------------------
/dev/rdsk/c1d0s5: (master volume)
/dev/rdsk/c1d1s5: (shadow volume)
/dev/rdsk/c1d1s6: (bitmap volume)
Group name: database
Dependent copy
Latest modified time: Sun Apr 27 02:05:09 2008
Volume size:   273105
Shadow chunks total: 4267 Shadow chunks used: 0
Percent of bitmap set: 0
        (bitmap clean)
Now let’s initiate a full copy resync on the group <code>database</code>:
# iiadm -c s -g database
When you check the state of your copies again, you will recognize that you initiated a full resync on both copies at the same time:
# iiadm -i
/dev/rdsk/c1d0s3: (master volume)
/dev/rdsk/c1d1s3: (shadow volume)
/dev/rdsk/c1d1s4: (bitmap volume)
Group name: database
Independent copy, copy in progress, copying master to shadow
Latest modified time: Sun Apr 27 02:08:09 2008
Volume size:   273105
Shadow chunks total: 4267 Shadow chunks used: 0
Percent of bitmap set: 42
        (bitmap dirty)
------------------------------------------------------------------------------
/dev/rdsk/c1d0s5: (master volume)
/dev/rdsk/c1d1s5: (shadow volume)
/dev/rdsk/c1d1s6: (bitmap volume)
Group name: database
Dependent copy, copy in progress, copying master to shadow
Latest modified time: Sun Apr 27 02:08:09 2008
Volume size:   273105
Shadow chunks total: 4267 Shadow chunks used: 0
Percent of bitmap set: 40
        (bitmap dirty)
Conclusion
I hope I gave you some insight into this really interesting feature of Solaris and OpenSolaris. There are vast possibilities to use it in your daily use. It’s not limited to disaster recovery or backups. One of my customers uses this tool to create independent copies of their database. They take a snapshot at midnight and export it on a different database server. The rationale for this process: They run some long running analytics with a huge load on the I/O system on this independent copy. By using the copy the analysis doesn’t interfere with the production use of the database. Another customer uses this feature for generating test copies of their production data for testing new software versions. You see, the possibilities are vast and virtually endless.
Do you want to learn more?
Documentation
docs.sun.com: Sun StorageTek AVS 4.0 Point-in-Time Copy Software Administration Guide[^38]
docs.sun.com: Manpage of iiadm[^39]
Misc.