iSCSI
Introduction
With more and more available bandwidth it gets more and more feasible to use only a single network to transmit data in the datacenter. Networking can get really complex when you have to implement two networks. For example for Ethernet and one for FC. It’s getting more complex and expensive, as FC network are mostly optical ones and Ethernet is a copper network in most datacenters.
The idea of using a single network for both isn’t really a new one, thus there were several attempts to develop mechanisms to allow the usage of remote block devices. One of the protocols to use block devices over IP networks is iSCSI. iSCSI is a protocol that was designed to allow clients to send SCSI commands to SCSI storage devices on a remote server.
There are other technologies like ATA or FC over Ethernet that were designed , but iSCSI is the most interesting one from my point of view, as you can use already existing and proven methods implemented for IP (for example IPsec) for encrypting the traffic.
The problem with iSCSI is the latency introduced with the usage of IP. But this problem can be solved by the usage of iSER or "iSCSI Extensions for RDMA" to use iSCSI as part of single-fabric network based on Infiniband. We already implement this mechanism in Solaris as a part of the COMSTAR iSER[^29] project.
The jargon of iSCSI
Yet another technology with its own jargon. I will only define the most important:
-
Initiator: The initiator is the client at iSCSI. It’s like the SCSI card in your machine, but instead of a SCSI cable it uses IP for the SCSI commands.
-
Target: The target is a storage resource on a iSCSI server.
-
LUN: A LUN is the "logical unit number". It represents an individual SCSI device. In iSCSI it’s similar. When you want to use an iSCSI disk drive, the initiator connects the target and connects the initiator with the LUN in a iSCSI session.
-
IQN: To identify a target or an initiator, one of the naming schemes is the iSCSI Qualified Name (IQN). An example for an IQN is iqn.1986-03.com.sun:02:b29a71fb-ff60-c2c6-c92f-ff13555977e6
The architecture of iSCSI
The combination of all this components can be visualized like in this figure:
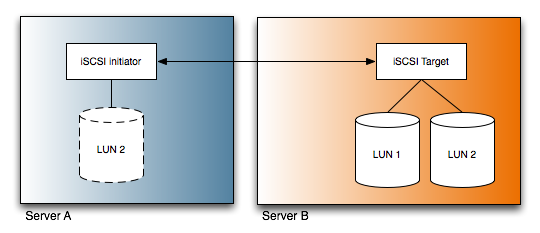
It’s a little bit simplified, but this is the core idea of iSCSI: How do I present a LUN on a remote server to another server via an IP network.
Simple iSCSI
At first I will show you, how to do a really simple iSCSI configuration. This is without any authentication. Thus everybody can connect to the iSCSI targets on the system. But this is sufficient for a test. And it’s this is better for having a quick success. ;)
Environment
For this example, I will use my both demo VMs again:
10.211.55.200   theoden
10.211.55.201   gandalf
Both systems runs with Solaris Express Build 84 for x86, but you can to the same with Solaris Update 4 for SPARC and x86 as well.
In our example, theoden is the server with the iSCSI target. gandalf is the server, which wants to use the LUN via iSCSI on theoden, thus gandalf is the server with the initiator.
Prerequisites
At first, we login to theoden and assume root privileges. Okay, to test iSCSI we need some storage volumes to play around. There is a nice way to create a playground with ZFS. You can use files as devices. But at first we have to create this files
# mkdir /zfstest
# cd /zfstest
#  mkfile 128m test1
#  mkfile 128m test2
#  mkfile 128m test3
#  mkfile 128m test4
Okay, now we stripe those four files in a zpool:
# zpool create testpool /zfstest/test1 /zfstest/test2 /zfstest/test3 /zfstest/test4
Now we make a short check for the zpool
# zpool list
NAME       SIZE   USED  AVAIL    CAP  HEALTH  ALTROOT
testpool   492M    97K   492M     0%  ONLINE  -
Configuring the iSCSI Target
We stay at server theoden. Okay, now we have to configure an iSCSI target. We create an emulated volume within the ZFS pool:
# zfs create -V 200m testpool/zfsvolume
# zfs list
NAME                 USED  AVAIL  REFER  MOUNTPOINT
testpool             200M   260M    18K  /testpool
testpool/zfsvolume   200M   460M    16K  -
The emulated volume has the size of 200M.Okay, it’s really easy to enable the iSCSI target. At first we have to enable the iSCSI Target service:
# svcadm enable iscsitgt
Now we share the volume via iSCSI
# zfs set shareiscsi=on testpool/zfsvolume
That’s all on the target
Configuring the iSCSI initiator
Okay, now we have configure the initiator. We have to login on gandalf and assume root privileges as well. At first we have to activate the initiator via SMF:
# svcadm enable iscsi_initiator
After this we configure the initiator and tell the initiator to discover devices on our iSCSI target.
# iscsiadm modify initiator-node -A gandalf
# iscsiadm add discovery-address 10.211.55.200
# iscsiadm modify discovery -t enable
Using the iSCSI device
Okay, now tell Solaris to scan for iSCSI devices.
# devfsadm -c iscsi
The -c iscsi limits the scan to iSCSI devices. With the format command we look for the available disks in the system:
# format
Searching for disks...done


AVAILABLE DISK SELECTIONS:
       0. c0d0 <DEFAULT cyl 4076 alt 2 hd 255 sec 63>
          /pci@0,0/pci-ide@1f,1/ide@0/cmdk@0,0
       1. c1d0 <DEFAULT cyl 4077 alt 2 hd 255 sec 63>
          /pci@0,0/pci-ide@1f,1/ide@1/cmdk@0,0
       2. c2t0100001C42E9F21A00002A0047E39E34d0 <DEFAULT cyl 198 alt 2 hd 64 sec 32>
          /scsi_vhci/disk@g0100001c42e9f21a00002a0047e39e34
Specify disk (enter its number): ^C
Okay, there is new device with a really long name. We can use this device for a zfs pool:
# zpool create zfsviaiscsi c2t0100001C42E9F21A00002A0047E39E34d0
# zpool list
NAME          SIZE   USED  AVAIL    CAP  HEALTH  ALTROOT
zfsviaiscsi   187M   480K   187M     0%  ONLINE  -
#
As you see, we have created a zfs filesystem via iSCSI on an emulated volume on a zpool on a remote system.
Bidirectional authenticated iSCSI
Okay, but we are in a public network. How can we protect the target against a user not allowed to use it? iSCSI supports a CHAP[^30] based authentication. It’s the same scheme as with PPP. With this authentication, target and initiator can authenticate each other based on shared secrets. The configuration is a little bit more complex, as both initiator and target have to know the secrets and their names of each other.
Prerequisites
At first we need some basic data. We need the IQN names of both. At first we look up the IQN of the initiator. Thus we login to gandalf and assume root privileges:
# iscsiadm list initiator-node
Initiator node name: iqn.1986-03.com.sun:01:00000000b89a.47e38163
Initiator node alias: gandalf
[...]
Now we look up the IQN of the target. Okay, we login to theoden and assume root privileges:
# iscsitadm list target
Target: testpool/zfsvolume
    iSCSI Name: iqn.1986-03.com.sun:02:b29a71fb-ff60-c2c6-c92f-ff13555977e6
iqn.1986-03.com.sun:02:b29a71fb-ff60-c2c6-c92f-ff13555977e6
    Connections: 1
Both IQN«s are important in the following steps. We need them as a identifier for the systems.
Configuring the initiator
At first we export the zpool and disable the discovery of targets. This steps has to be done on the initiator, in our example gandalf:
# zpool export zfsviaiscsi
# iscsiadm remove discovery-address 10.211.55.200
# devfsadm -c iscsi -C
You don’t have to do this steps. The zpool may only get unavailable while we configure the authentication and you will see a few more lines in your logfiles.
Okay, now we configure the CHAP authentication.
# iscsiadm modify initiator-node --CHAP-name gandalf
# iscsiadm modify initiator-node --CHAP-secret
Enter secret:
Re-enter secret:
# iscsiadm modify initiator-node --authentication CHAP
What have we done with this statements: We told the iSCSI initiator to identify itself as gandalf. Then we set the password and tell the initiator to use CHAP to authenticate.
Configuring the target
Okay, now we configure the target to use CHAP as well. This has to be done on the target, in our example theoden. But at first we have to set the CHAP name and the CHAP secret of the target itself:
# iscsitadm modify admin --chap-name theoden
# iscsitadm modify admin --chap-secret
Enter secret:
Re-enter secret:
This isn’t an admin login. This is a little misguiding.
Now we create an initiator object on the target.We connect the long IQN with a shorter name.
# iscsitadm create initiator --iqn iqn.1986-03.com.sun:01:00000000b89a.47e38163 gandalf
Now we tell the target, that the initiator on the system gandalfwill identify itself with the name gandalf:
# iscsitadm modify initiator --chap-name gandalf gandalf
Okay, now we set the password for this initiator. This is the same password we set on the initiator.
# iscsitadm modify initiator --chap-secret gandalf
Enter secret:
Re-enter secret:
Finally we tell the target, that the system gandalf is allowed to access the testpool/zfsvolume:
# iscsitadm modify target --acl gandalf test/zfsvolume
Now the initiator has to authenticate itself before the target daemon grants access to the target. You could skip the next steps and fast-forward to the section "Reactivation of the zpool" but the authentication is only unidirectional at the moment. The client(initiator) authenticate itself at the server(target).
Configuration of bidirectional configuration
Okay, but it would be nice, that the target identifies himself to initiator as well. Okay, at first we tell the initiator, that the target with the IQN iqn.1986-03.com.sun:02:b29a71fb-ff60-c2c6-c92f-ff13555977e6 will authenticate itself with the name theoden. This steps has to be done on the initiator, thus we login into gandalf again.
# iscsiadm modify target-param --CHAP-name theoden iqn.1986-03.com.sun:02:b29a71fb-ff60-c2c6-c92f-ff13555977e6
Now we set the secret to authenticate. This is the secret we configured as the CHAP-Secret on the target with iscsitadm modify admin --chap-secret:
# iscsiadm modify target-param --CHAP-secret iqn.1986-03.com.sun:02:b29a71fb-ff60-c2c6-c92f-ff13555977e6
Enter secret:
Re-enter secret:
Now we activate the bidirectional authentication for the IQN of theoden:
# iscsiadm modify target-param --bi-directional-authentication enable iqn.1986-03.com.sun:02:b29a71fb-ff60-c2c6-c92f-ff13555977e6
At last we tell the initiator to authenticate the target with CHAP.
# iscsiadm modify target-param -a chap iqn.1986-03.com.sun:02:b29a71fb-ff60-c2c6-c92f-ff13555977e6
Okay, now we have completed the configuration for the bidirectional authentication.
Reactivation of the zpool
Okay ... now we can reactivate the zpool. We tell the initiator to discover targets on the target server again, scan for devices and import the zpool again:
# iscsiadm add discovery-address 10.211.55.200
# devfsadm -c iscsi -C
# zpool import zfsviaiscsi
# cd /zfsviaiscsi/
Alternative backing stores for iSCSI volumes
Albeit very easy to use iSCSI in conjunction with ZFS emulated volumes it doesn’t have to be this way. You can use different kinds of backing store for iSCSI.
File based iSCSI target
One way to provide for storage for an iSCSI target. You can use files for this task. Okay, we have to login as root on theoden:
# mkdir -p /var/iscsitargets
# iscsitadm modify admin -d /var/iscsitargets
At first we’ve created an directory to keep the files, then we tell the target daemon to use this for storing the target. After this we can create the target:
# iscsitadm create target --size 128m smalltarget
Now we can check for the iSCSI Target.
# iscsitadm list target -v smalltarget
Target: smalltarget
    iSCSI Name: iqn.1986-03.com.sun:02:3898c6a7-1f43-e298-e189-83d10f88131d.smalltarget
    Connections: 0
    ACL list:
    TPGT list:
    LUN information:
        LUN: 0
            GUID: 0100001c42e9f21a00002a0047e45145
            VID: SUN
            PID: SOLARIS
            Type: disk
            Size:  128M
            Status: offline
Now we switch to the server we use as an initiator. Let’s scan for new devices on gandalf. As we’ve activated the discovery of targets before, we’ve just have to scan for new devices.
# devfsadm -c iscsi -C
# format
Searching for disks...done


AVAILABLE DISK SELECTIONS:
       0. c0d0 <DEFAULT cyl 4076 alt 2 hd 255 sec 63>
          /pci@0,0/pci-ide@1f,1/ide@0/cmdk@0,0
       1. c1d0 <DEFAULT cyl 4077 alt 2 hd 255 sec 63>
          /pci@0,0/pci-ide@1f,1/ide@1/cmdk@0,0
       2. c2t0100001C42E9F21A00002A0047E39E34d0 <SUN-SOLARIS-1-200.00MB>
          /scsi_vhci/disk@g0100001c42e9f21a00002a0047e39e34
       3. c2t0100001C42E9F21A00002A0047E45145d0 <DEFAULT cyl 126 alt 2 hd 64 sec 32>
          /scsi_vhci/disk@g0100001c42e9f21a00002a0047e45145
Specify disk (enter its number):
Specify disk (enter its number): ^C
#
Et voila, an additional LUN is available on our initiator.
Thin-provisioned target backing store
One nice thing about ZFS is it’s ability to provide thin provisioned emulated ZFS volumes (zvol). You can configure a volume of an larger size than the physical storage you have available. This is useful, when you want to have an volume in it’s final size (because resizing would be a pain in the a...) but don’t want do spend the money for the disks because you know that much less storage would be needed at first.
It’s really easy to create such a kind of a zvol:
# zfs create -s -V 2g testpool/bigvolume
That’s all. The difference is the small -s. It tells ZFS to create an sparse (aka thin) provisioned volume.
Well, I won’t enable iSCSI for this by =on@ itself. I will configure this manually. As normal volumes zvols are available within the /dev tree of your filesystem:
# ls -l /dev/zvol/dsk/testpool
total 4
lrwxrwxrwx   1 root     root          35 Mar 22 02:09 bigvolume -> ../../../../devices/pseudo/zfs@0:2c
lrwxrwxrwx   1 root     root          35 Mar 21 12:33 zfsvolume -> ../../../../devices/pseudo/zfs@0:1c
Okay, we can use this devices as a backing store for an iSCSI target as well. We’ve created a zvol bigvolume within the zpool testpool. Thus the device is /dev/zvol/dsk/testpool/bigvolume:
# iscsitadm create target -b /dev/zvol/dsk/testpool/bigvolume bigtarget
Okay, i«m switching to my root shell on the initiator. Again we scan for devices:
# devfsadm -c iscsi -C
# format
Searching for disks...done


AVAILABLE DISK SELECTIONS:
       0. c0d0 <DEFAULT cyl 4076 alt 2 hd 255 sec 63>
          /pci@0,0/pci-ide@1f,1/ide@0/cmdk@0,0
       1. c1d0 <DEFAULT cyl 4077 alt 2 hd 255 sec 63>
          /pci@0,0/pci-ide@1f,1/ide@1/cmdk@0,0
       2. c2t0100001C42E9F21A00002A0047E39E34d0 <SUN-SOLARIS-1-200.00MB>
          /scsi_vhci/disk@g0100001c42e9f21a00002a0047e39e34
       3. c2t0100001C42E9F21A00002A0047E45DB2d0 <DEFAULT cyl 1021 alt 2 hd 128 sec 32>
          /scsi_vhci/disk@g0100001c42e9f21a00002a0047e45db2
Let’s create an zpool:
# zpool create zfsviaiscsi_thin c2t0100001C42E9F21A00002A0047E45DB2d0
# zpool list
NAME               SIZE   USED  AVAIL    CAP  HEALTH  ALTROOT
zfsviaiscsi        187M   112K   187M     0%  ONLINE  -
zfsviaiscsi_thin  1.98G   374K  1.98G     0%  ONLINE  -
Do you remember, that we used four 128 MB files as the devices for our zpool on our target. Well, you have an 1.98G filesystem running on this files. You can add more storage to the zpool on the target and you have nothing to do on the initiator. Not a real kicker for ZFS, but imagine the same for other filesystem that can’t be grown so easy like a zpool.
Conclusion
Okay, this was a quick introduction to the actual implementation of iSCSI on Solaris. The future will bring changes to the implementation of the iSCSI target feature but new possibilities as well. iSCSI will be an part of the COMSTAR framework[^31] in the future besides of an SAS target or an FC target.
Do you want to learn more?
Documentation
docs.sun.com: Configuring Solaris iSCSI Targets and Initiators[^32]
Using iSCSI Multipathing in the Solaris(tm) 10 Operating System[^33]
Misc links.