IP Multipathing
Introduction
Before people start to think about clusters and loadbalancers to ensure the availability, they start with the low hanging fruits. Such an low hanging fruit is the protection of the availability of the network connection. Solaris has an integrated mechanism to ensure this availability. It«s called IP Multipathing.
This topic has to explain two mechanisms becaus the IP Multipathing is a topic in flux at the moment. The implementation in Solaris and OpenSolaris is different to the mechanism in recent builds of OpenSolaris CE and OpenSolaris 2009.06. You can configure the new IPMP exactly like the old one, but the new procedure is vastly easier so i will explain both.
Basic Concept of IP Multipathing
I should start with the basic terminology of IPMP.
-
IP link
-
Network Interface Card
-
Physical Interface
-
IPMP Group Now you have physical interfaces on some network interface cards in several IP Links. How do you tell the system, that certain interfaces are redundant connections into the same IP link? You put the matching interfaces into a IPMP group, all interfaces are considered as redundant to each other so the IPMP can use one of them the network traffic.
-
Failure You do IPMP for a reason. You want protect your system from loosing it«s network connection in the case a networking component fails. But the interesting question is: How do you detect an failure. IPMP knows two mechanism to detect the failure.
-
Link based As the name suggests, the link based failure detection checks if the physical interface has a active link to the network. When an interface looses it’s link - for example by problems with the cabling or a switch powered down - it considers the interface as failed and starts to failover to a running link.
-
Probe based The probe based failure detection sends ICMP messages to a number of systems. As long the other systems react on those ICMP packets, a link is considered as ok. When those other systems doesn’t react in a certain time, the link is considered as failed and the failover takes place
I will talk about the advantages and disadvantages of both in a later section.
-
-
Data Address
-
Test Address
-
Repair
-
Target systems
Link based vs. probe based failure/repair detection
As i wrote before, there are two methods of failure detection. Both have their advantages and disadvantages.
Link based
The link based method is the fasted method of both, whenever the link goes down, the IPMP gets a notification of the state-change of the interface. So it can react within a few seconds. Furthermore it doesn«t need any test addresses, as it doesn«t check on the IP layer and just use the link state.
But there is a big disadvantage. It doesn«t check for the health of your IP connection. Consider the following network:
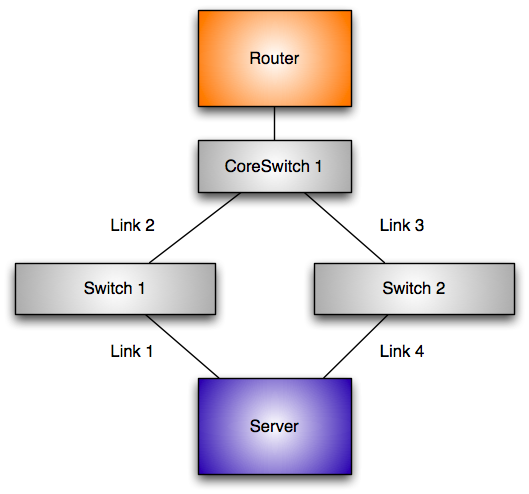
Let«s assume that link 1 fails. Obviously the link at the physical interface goes down. The system can react to this problem and swtich over to the other networking card.
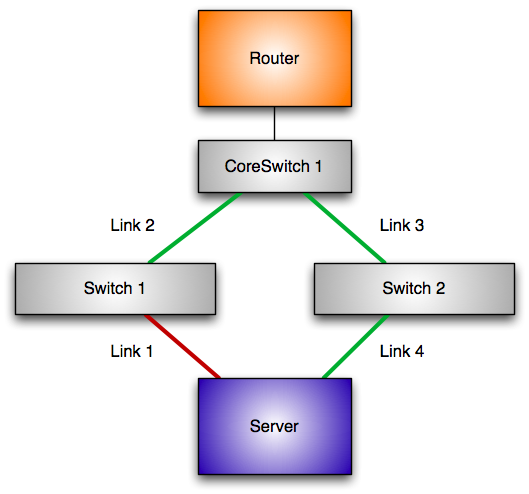
But let«s assume that link 2 fails.

The link on the connection link 1 is still up and the system considers the connection to the network as functional. But your networking connection is still broken, as your default router is gone.
Probe based
The probe based failure detection uses ICMP messages to check a functional IP network. So it can check if you really have an IP connection to your default router and not just a link to a switch between the server and the router. But this method has a disadvantage as well. You need vastly more IP-addresses. Every interface in the IPMP address needs a test address. The test address is used to test the connection and stays at the interface even in the case of a failure[^21].
An IPMP group with four connections need 5 addresses to ensure and provide the service one data address. However you can ease the consumption of IP-Address by using a private network different to the data addresses.
IPMP vs. Link Bundling
For quite a long time switches and servers support the bundling of ethernet connections to increase the speed and the reliability of your networking connection. So ... why should you use IPMP? The reason is a simple one. When you use bundling all your connections end on the same switch, thus this mechanisms won’t help you in the case of a switch failure. The mechanism of IPMP doesn«t work in the Layer 2 of the network, it works in the third layer and so it doesn«t have the capability. The connections of an IPMP group can end in different switches, they can have different speeds, they could be even of different technology, as long they use IP (this was more of avantage in the past, today in the "Ethernet Everything" age this point lost it«s appeal).
Classic IPMP vs. new IPMP
Almost many concepts of the classic and the new IPMP concept are similar there are some important differences between both. The most important different is the binding of the data address to the interfaces. With classic IPMP the data address is switched to the active interface. With new IPMP you have an ipmp interface in front of the network interfaces building the IPMP group. The ipmp interface holds the data address and it isn«t switched at any time.
in.mpathd
Independent if you use the classic or the new IPMP, there is one component that may be different in it’s exact implementation, but has the same job. It’s the in.mpathd. This daemon is automatically started, when you configure IPMP on your system.
Prerequisites
At first you need a system. In this tutorial i will use a system with three interfaces. Two of them are Intel networking cards. They are named e1000g0 and e1000g0. The third interface is a Nvidia LAN adapter called nge0, i need it later on. The configuration of the test network is straight forward. The subnet in this test is 192.168.178.0/24. I have a router at 192.168.178.1. The router is connected to a switch. The workstation used for this test is connected with both e1000g interfaces into the this switch.
... insert graphics ...
To make the configuration a little bit more comfortable, we add a few hosts to our /etc/hosts file. We need three adressed while going through the tutorial. At first we need the data address:
echo "192.168.178.230 a340" >> /etc/hosts
Now we need test adresses. It’s a good practice to use the name of the data address appended with the name of the physical address:
echo "192.168.178.231 a340-e1000g0" >> /etc/hosts
echo "192.168.178.232 a340-e1000g1" >> /etc/hosts
New IPMP
So, you have a relatively new OpenSolaris. Then you can use the new IPMP mechanism. At first: It’s possible just to use the old configuration statements and the system will configure IPMP like with the classic IPMP, just with the new technology in background. This is possible, as the new IPMP configures automagically the IPMP interface based on the named IPMP group. But another way is the recommended way.
As i wrote before, the new IPMP doesn«t use a virtual Interface switching from one interface to the other. You have a special kind of interface for it. At first we configure this interface.
jmoekamp@a340:/etc# ifconfig production0 ipmp a340 up
With this command you’ve configured an IPMP interface. You don’t have to call it ipmp0, you can use any name you want, it just has to begin with a letter and has to end on a number. Now let’s look at the interface:
jmoekamp@a340:/etc# ifconfig production0
production0: flags=8011000803<UP,BROADCAST,MULTICAST,IPv4,FAILED,IPMP> mtu 68 index 10
	inet 192.168.178.230 netmask ffffff00 broadcast 192.168.178.255
	groupname production0
As you see, it’s a normal network interface with some specialities: At first it’s in the mode failed at the moment. There are no network interfaces configured to the group, thus you can’t connect anywhere over this interface. The interface has already it’s data address. It isn’t moved from here. At the end you see the name of the IPMP group. Per default it’s equal to the name of the interface.
Okay, now we have to assign some physical interfaces to it. Now we have to make a decision. Do we want’t to use IPMP with probes or without probes. As i’ve explained before it’s important to know at this point what failure scenarios you want to cover with your configuration.
Link based failure detection
I want to explain the configuration of the link based failure detection at first because it’s easier, but to show you the problems,too.
Configuration
As explained before, the link based failure detection just snoops on certain events of the networking card like a lost link. Thus we just have to configure the interface into the IPMP group that you want to protect against a link failure. You don’t have to configure any IP adresses on the member interfaces of the system. Okay, at first we plumb the interfaces we want to use in our IPMP group.
jmoekamp@a340:/etc# ifconfig e1000g0 plumb
jmoekamp@a340:/etc# ifconfig e1000g1 plumb
Okay, now we add the both interfaces into the IPMP group.
jmoekamp@a340:/etc# ifconfig e1000g0 -failover group production0 up
jmoekamp@a340:/etc# ifconfig e1000g1 -failover group production0 up
As you may have noticed, we didn’t specify a IP address or a hostname. With link-based failure detection you don’t need it. The IP address of the group ist located on the IPMP interface we’ve defined a few moments ago.
Playing around
Now we need to interact with the hardware. We will pull some cables. But before we are doing this, we look at the initial status of our IPMP configuration. The new IPMP model introduced a command for this task. It’s called ipmpstat.
jmoekamp@a340:/etc# ipmpstat -i
INTERFACE   ACTIVE  GROUP       FLAGS     LINK      PROBE     STATE
e1000g1     yes     production0 -------   up        disabled  ok
e1000g0     yes     production0 --mb---   up        disabled  ok
Just to give you a short tour through the command. At first we see the interface, then we see if IPMP uses this interface. After this the command tells us the IPMP group of the interface. The flags sections tells us some detailed data, the --mb-- tells us, that the interface e1000g0 was choosen for sending and receiving multicast and broadcast data. The next column tells us, that the interface is up, that we’ve disabled probes[^22]. The last column tells us, that the state of the interface is OK and so it’s used in the IPMP group.
Okay, now pull the cable in e1000g0. The system automatically switches to e1000g1 as active interace.
jmoekamp@a340:/etc# ipmpstat -i
INTERFACE   ACTIVE  GROUP       FLAGS     LINK      PROBE     STATE
e1000g1     yes     production0 --mb---   up        disabled  ok
e1000g0     no      production0 -------   down      disabled  failed
As you see, the failure has been detected on the e1000g0 interface. The Link is down, thus it’s failed, thus it’s no longer active. Okay, let’s repair it. Plug the cable back to e1000g0 interface. After a few seconds, the link is up, the in.mpathd gets this messages, so the state of the interface is ok and thus it’s reactivated.
INTERFACE   ACTIVE  GROUP       FLAGS     LINK      PROBE     STATE
e1000g1     yes     production0 --mb---   up        disabled  ok
e1000g0     yes     production0 -------   up        disabled  ok
The problem with link-based failure detection in practice
To see the problem on you own just put an additional switch between your system and the switch you used before. As you had to remove the cabling, the active connection should jump to the unmodifed connection. Wait a few seconds to ensure the link detection settles down. Ensure that the IPMP choose the link with the switch by zipping the cable from the switch for a few moments. Wait a few seconds again. Now remove the cable between the both switches. As there is still a link on the cable, the IPMP doesn’t use the other interface.
Probe based failure detection
The probe based detection is much more intelligent. At first it has all the capabilities of the link-based detection. It switches over to the other network card, as soon as the card looses the link. But additionally it checks the availability of the connection by pinging other ip addresses called probe targets. When the system doesn’t get a reply on it’s packages it switches over to a functional connection to the network.
Configuration
Okay, at first we revert back to the original state of the system. This is easy, we just unplumb the interfaces. In my example i’m unplumbing all interfaces. You could reuse the production interface, but i’m including it here just for the case, you just started reading this tutorial at the beginning of this paragraph[^23]. It’s important that you unplumb the member interfaces of the group before you unplumb the IPMP interface, otherwise you get an error message:
jmoekamp@a340:/etc# ifconfig e1000g0 unplumb
jmoekamp@a340:/etc# ifconfig e1000g1 unplumb
jmoekamp@a340:/etc# ifconfig production0 unplumb
Okay, now all the interfaces are away. Now we recreate the IPMP group.
jmoekamp@a340:/etc# ifconfig production0 ipmp a340 up
we can check this by using the ipmpstat command.
jmoekamp@a340:/etc# ipmpstat -g
GROUP       GROUPNAME   STATE     FDT       INTERFACES
production0 production0 failed    --        --
No interfaces in the group. We configure the first interface into the group.
jmoekamp@a340:/etc# ifconfig e1000g0 plumb a340-e1000g0 -failover group production0 up
There is an important difference. We configure an IP address to the interface. This automatically sets IPMP in the probe based failure detection. Let’s check the ipmp group again:
jmoekamp@a340:/etc# ipmpstat -g
GROUP       GROUPNAME   STATE     FDT       INTERFACES
production0 production0 ok        10.00s    e1000g0
There is now an interface in the group. Of course an IPMP group with just one interface doesn’t really make sense. So configure a second one into the group.
jmoekamp@a340:/etc# ifconfig e1000g1 plumb a340-e1000g1 -failover group production0 up
Let’s check again.
jmoekamp@a340:/etc# ipmpstat -g
GROUP       GROUPNAME   STATE     FDT       INTERFACES
production0 production0 ok        10.00s    e1000g1 e1000g0
Both interfaces are in the IPMP group. And that’s all ... we’ve just made our networking configuration highly available by this two commands.
Playing around
I hope, you have still the hardware configuration in place we used for showing the problems of link based failure detection. In the case you haven’t please replicate the configuration we’ve used there.
Disadvantages of probe based failure detection
The probe based failure detection isn’t without a disadvantage. You need a test IP adresses for every interface in an IPMP group. The good side: The IP addresses doesn’t have to be routable one, they doesn’t even have to be in the same subnet as the data address. It’s perfectly possible to use a routable IP address as the data address and to use for example the 192.168.178.0/24 address just for IPMP purposes. You have just to take care of one thing: You have to provide testing targets in the same network, for example by placing an additional IP address on your router interfaces for example.
Making the configuration boot persistent
Classic IPMP
IPMP is a really old feature. It’s in Solaris for several versions now. The following configuration is valid for Solaris 10 and versions of Opensolaris up to Build xxx.
Monitoring the actions of IPMP in your logfiles
All actions of the IPMP subsystem are logged by syslog. In this section i will show you the log messages that you get when a failure occurs and a repair takes place.