Crossbow
Introduction
At the moment ZFS, DTrace or Zones are the well known features of Solaris. But in my opinion there will be a fourth important feature soon. Since Build 105 it’s integrated (many people will already know which feature i want to describe in this artcle) into Solaris. This feature has the project name Crossbow.
It’s the new TCP/IP stack of Opensolaris and was developed with virtualisation in mind from ground up. "Virtualisation in mind" does not only lead to the concept of virtual network interface cards, you can configure virtual switches as well and even more important: You can control the resource usage of a virtual client or managing the load by distributing certain TCP/IP traffic to dedicated CPUs. I’ve already held some talks about Crossbow at different events, thus it’s time to write an article about this topic. I will start with the virtualisation part of Crossbow.
Virtualisation
This part is heavily inspired by this blog entry of Ben Rockwood[^17], but he ommited some parts in the course of his article to make a full walk-through out of it, so i extended it a little bit.
Normally a network consists out of switches and networking cards, server and router . It’s easy to replicate this in a single system. Networking cards can be simulated by VNICS, switches are called etherstubs in the namespace of Crossbow. Server can be simulated by zones of course, and as router are not much more than special-purpose servers, we could simulate them by a zone as well.
A simple network
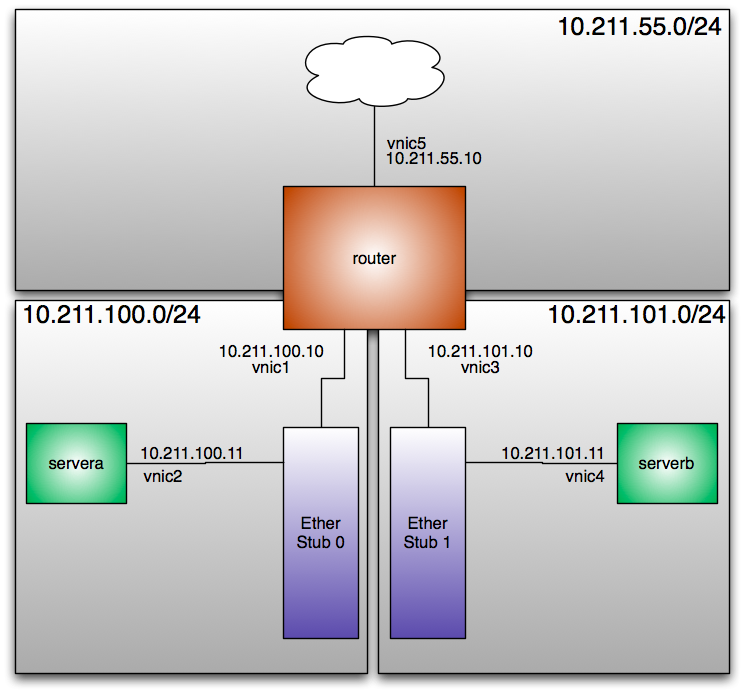
Let’s simulate a simple network at first. Just two servers and a router:
Configuration of the network
At first we create two virtual switches. They are called etherstub0 and etherstub1
# dladm create-etherstub etherstub0
# dladm create-etherstub etherstub1
Okay, now we create virtual nics that are bound to the virtual switch etherstub0. These virtual nics are called vnic1 and vnic0.
# dladm create-vnic -l etherstub0 vnic1
# dladm create-vnic -l etherstub0 vnic2
Now we do the same with our second virtual switch:
# dladm create-vnic -l etherstub1 vnic3
# dladm create-vnic -l etherstub1 vnic4
Okay, let’s look up the configuration of our network.
# dladm showlink
LINK        CLASS    MTU    STATE    OVER
ni0         phys     1500   unknown  --
etherstub0  etherstub 9000  unknown  --
etherstub1  etherstub 9000  unknown  --
vnic1       vnic     9000   up       etherstub0
vnic2       vnic     9000   up       etherstub0
vnic3       vnic     9000   up       etherstub1
vnic4       vnic     9000   up       etherstub1
vnic5       vnic     1500   up       ni0
Yes, that’s all ... but what can we do with it? For example simulating a complete network in your system. Let’s create a network with two networks, a router with a firewall and nat and a server in each of the network. Obviously we will use zones for this.
A template zone
At first we create a template zone. This zone is just used for speeding up the creation of other zones. To enable zone creation based on ZFS snapshots, we have to create a filesystem for our zones and mount it at a nice position in your filesystem:
# zfs create rpool/zones
# zfs set compression=on rpool/zones
# zfs set mountpoint=/zones rpool/zones
Now we prepare a command file for the zone creation. The pretty much the standard for a sparse root zone. We don’t configure any network interfaces, as we never boot or use this zone. It’s just a template as the name alreay states. So at first we create a file called template in a working directory. All the following steps assume that you are in this directory as i won’t use absolute paths.
create -b
set zonepath=/zones/template
set ip-type=exclusive
set autoboot=false
add inherit-pkg-dir
set dir=/lib
end
add inherit-pkg-dir
set dir=/platform
end
add inherit-pkg-dir
set dir=/sbin
end
add inherit-pkg-dir
set dir=/usr
end
add inherit-pkg-dir
set dir=/opt
end
commit
Now we create the zone. Depending on your test equipment this will take some times.
# zonecfg -z template -f template
# zoneadm -z template install
A ZFS file system has been created for this zone.
Preparing to install zone <template>.
Creating list of files to copy from the global zone.
Copying <3488> files to the zone.
Initializing zone product registry.
Determining zone package initialization order.
Preparing to initialize <1507> packages on the zone.
Initialized <1507> packages on zone.
Zone <template> is initialized.
The file </zones/template/root/var/sadm/system/logs/install_log> contains a log of the zone installation.
#
Got a coffee? The next installations will be much faster.We will not boot it as we don’t need it for our testbed.
site.xml
While waiting for the zone installation to end we can create a few other files. At first you should create a file called site.xml. This files controls which services are online after the first boot. You can think of it like an sysidcfg for the Service Management Framework. The file is rather long, so i won’t post it in the article directly. You can download my version of this file here[^18]
Zone configurations for the testbed
At first we have to create the zone configurations. The files are very similar. The differences are in the zonepath and in the network configuration. The zone servera is located in /zones/serverA and uses the network interface vnic2. This will is called serverA:
create -b
set zonepath=/zones/serverA
set ip-type=exclusive
set autoboot=false
add inherit-pkg-dir
set dir=/lib
end
add inherit-pkg-dir
set dir=/platform
end
add inherit-pkg-dir
set dir=/sbin
end
add inherit-pkg-dir
set dir=/usr
end
add inherit-pkg-dir
set dir=/opt
end
add net
set physical=vnic2
end
commit
The zone serverb uses the directory /zones/serverB and is configured to bind to the interface vnic4. Obviously i’ve named the configuration file serverB
create -b
set zonepath=/zones/serverB
set ip-type=exclusive
set autoboot=false
add inherit-pkg-dir
set dir=/lib
end
add inherit-pkg-dir
set dir=/platform
end
add inherit-pkg-dir
set dir=/sbin
end
add inherit-pkg-dir
set dir=/usr
end
add inherit-pkg-dir
set dir=/opt
end
add net
set physical=vnic4
end
commit
We have created both config files for the simulated servers. Now we do the same for our simulated router. The configuration of the router zone is a little bit longer as we need more network interfaces. I opened a file called router and filled it with the following content:
create -b
set zonepath=/zones/router
set ip-type=exclusive
set autoboot=false
add inherit-pkg-dir
set dir=/lib
end
add inherit-pkg-dir
set dir=/platform
end
add inherit-pkg-dir
set dir=/sbin
end
add inherit-pkg-dir
set dir=/usr
end
add inherit-pkg-dir
set dir=/opt
end
add net
set physical=vnic5
end
add net
set physical=vnic1
end
add net
set physical=vnic3
end
commit
sysidcfg files
To speed up installation we create some sysidconfig files for our zones. Without this files, the installation would "go interactive" and you would have to use menus to provide the configuration informations. When you copy place such a file at /etc/sysidcfg the system will be initialized with the information provided in the file.
I will start with the sysidcfg file of router zone:
system_locale=C
terminal=vt100
name_service=none
network_interface=vnic5 {primary hostname=router1 ip_address=10.211.55.10 netmask=255.255.255.0 protocol_ipv6=no default_route=10.211.55.1}
network_interface=vnic1 {hostname=router1-a ip_address=10.211.100.10 netmask=255.255.255.0 protocol_ipv6=no default_route=NONE}
network_interface=vnic3 {hostname=router1-b ip_address=10.211.101.10 netmask=255.255.255.0 protocol_ipv6=no default_route=NONE}
nfs4_domain=dynamic
root_password=cmuL.HSJtwJ.I
security_policy=none
timeserver=localhost
timezone=US/Central
After this, we create a second sysidconfig file for our first server zone. I store the following content into a file called servera_sysidcfg:
system_locale=C
terminal=vt100
name_service=none
network_interface=vnic2 {primary hostname=server1 ip_address=10.211.100.11 netmask=255.255.255.0 protocol_ipv6=no default_route=NONE}
nfs4_domain=dynamic
root_password=cmuL.HSJtwJ.I
security_policy=none
timeserver=localhost
timezone=US/Central
When you look closely at the network_interface line you will see, that i didn’t specified a default route. Please keep this in mind. In a last step i create serverb_sysidcfg. It’s the config file for our second server zone:
system_locale=C
terminal=vt100
name_service=none
network_interface=vnic4 {primary hostname=server2 ip_address=10.211.101.11 netmask=255.255.255.0 protocol_ipv6=no default_route=NONE}
nfs4_domain=dynamic
root_password=cmuL.HSJtwJ.I
security_policy=none
timeserver=localhost
timezone=US/Central
Firing up the zones
After creating all this configuration files, we use them to create some zones. The procedure is similar for all zone. At first we do the configuration. After this we clone the template zone. As we located the template zone in a ZFS filesystem, the cloning takes just a second. Before we boot the zone, we place our configuration files we prepared while waiting for the installation of the template zone.
# zonecfg -z router -f router
# zoneadm -z router clone template
Cloning snapshot rpool/zones/template@SUNWzone3
Instead of copying, a ZFS clone has been created for this zone.
# cp router_sysidcfg /zones/router/root/etc/sysidcfg
# cp site.xml /zones/router/root/var/svc/profile
# zoneadm -z router boot
We repeat the steps for servera.
# zonecfg -z servera -f serverA
# zoneadm -z servera clone template
Cloning snapshot rpool/zones/template@SUNWzone3
Instead of copying, a ZFS clone has been created for this zone.
# cp serverA_sysidcfg /zones/serverA/root/etc/sysidcfg
# cp site.xml /zones/serverA/root/var/svc/profile
# zoneadm -z servera boot
At last we repeat it for our zone serverb again:
# zonecfg -z serverb -f serverB
# zoneadm -z serverb clone template
Cloning snapshot rpool/zones/template@SUNWzone3
Instead of copying, a ZFS clone has been created for this zone.
# cp serverb_sysidcfg /zones/serverB/root/etc/sysidcfg
# cp site.xml /zones/serverB/root/var/svc/profile
# zoneadm -z serverb boot
After completing the last step, we display the existing zones.
# zoneadm list -v
  ID NAME             STATUS     PATH                           BRAND    IP
   0 global           running    /                              native   shared
  13 router           running    /zones/router                  native   excl
  15 servera          running    /zones/serverA                 native   excl
  19 serverb          running    /zones/serverB                 native   excl
All zones are up and running.
Playing around with our simulated network
At first a basic check. Let’s try to plumb one of the VNICs already used in a zone.
# ifconfig vnic2 plumb
vnic2 is used by non-globalzone: servera
Excellent. The system prohibits the plumbing. Before we can play with our mini network, we have to activate forwarding and routing on our new router. Since Solaris 10 this is really easy. There is a command for it:
# routeadm -e ipv4-forwarding
# routeadm -e ipv4-routing
# routeadm -u
# routeadm
              Configuration   Current              Current
                     Option   Configuration        System State
---------------------------------------------------------------
               IPv4 routing   enabled              enabled
               IPv6 routing   disabled             disabled
            IPv4 forwarding   enabled              enabled
            IPv6 forwarding   disabled             disabled

           Routing services   "route:default ripng:default"

Routing daemons:

                      STATE   FMRI
                   disabled   svc:/network/routing/zebra:quagga
                   disabled   svc:/network/routing/rip:quagga
                   disabled   svc:/network/routing/ripng:default
                   disabled   svc:/network/routing/ripng:quagga
                   disabled   svc:/network/routing/ospf:quagga
                   disabled   svc:/network/routing/ospf6:quagga
                   disabled   svc:/network/routing/bgp:quagga
                   disabled   svc:/network/routing/isis:quagga
                   disabled   svc:/network/routing/rdisc:default
                     online   svc:/network/routing/route:default
                   disabled   svc:/network/routing/legacy-routing:ipv4
                   disabled   svc:/network/routing/legacy-routing:ipv6
                     online   svc:/network/routing/ndp:default
This test goes only skin-deep into the capabilities of Solaris in regard of routing. But that is stuff for more than one LKSF tutorial. Now let’s look into the routing table of one of our server:
# netstat -nr

Routing Table: IPv4
  Destination           Gateway           Flags  Ref     Use     Interface
-------------------- -------------------- ----- ----- ---------- ---------
default              10.211.100.10        UG        1          0 vnic2
10.211.100.0         10.211.100.11        U         1          0 vnic2
127.0.0.1            127.0.0.1            UH        1         49 lo0
Do you remember, that i’ve asked you to keep in mind, that we didn’t specified a default route in the sysidcfg? But why have we such an defaultrouter now. There is some automagic in the boot. When a system with a single interfaces comes up without an default route specified in /etc/defaultrouter or without being a dhcp client it automatically starts up the router discovery protocol as specified by RPC 1256[^19]. By using this protocol the hosts adds all available routers in the subnet as a defaultrouter.
The rdisc protocol is implemented by the in.routed daemon. It implements two different protocols. The first one is the already mentioned rdisc protocol. But it implements the RIP protocol as well. The RIP protocol part is automagically activated when a system has more than one network interface.
# ping 10.211.100.11
10.211.100.11 is alive
# traceroute 10.211.100.11
traceroute to 10.211.100.11 (10.211.100.11), 30 hops max, 40 byte packets
 1  10.211.101.10 (10.211.101.10)  0.285 ms  0.266 ms  0.204 ms
 2  10.211.100.11 (10.211.100.11)  0.307 ms  0.303 ms  0.294 ms
#
As you can see ... we’ve builded a network in a box.
Building a more complex network
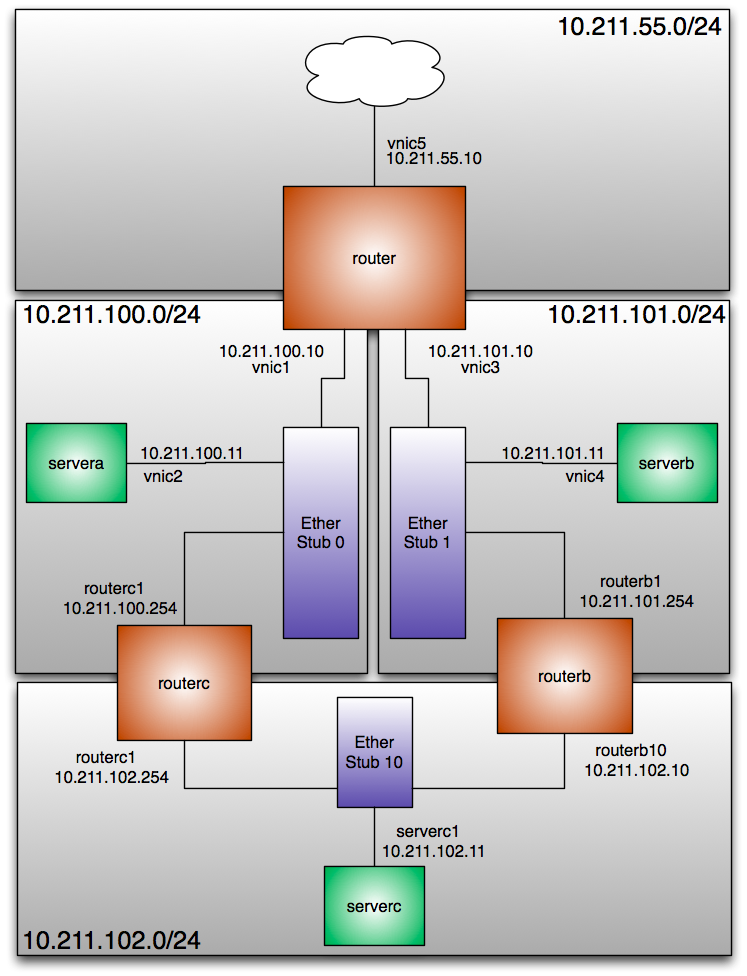
Let’s extend our example a little bit. We will create an example with more networks and switches, more servers and router. For a quick overview i put the figure 1.1{reference-type=”ref” reference=”extendedcrossbow”} on page .
At first we configure additional etherstubs and VNICs:
# dladm create-etherstub etherstub10
# dladm create-vnic -l etherstub1 routerb1
# dladm create-vnic -l etherstub10 routerb10
# dladm create-vnic -l etherstub10 serverc1
# dladm create-vnic -l etherstub1 routerc1
# dladm create-vnic -l etherstub10 routerc2
As you see, you are not bound to a certain numbering scheme. You can call a vnic as you want, as long it’s beginning with letters and ending with numbers. Now we use an editor to create a configuration file for our routerB:
create -b
set zonepath=/zones/routerB
set ip-type=exclusive
set autoboot=false
add inherit-pkg-dir
set dir=/lib
end
add inherit-pkg-dir
set dir=/platform
end
add inherit-pkg-dir
set dir=/sbin
end
add inherit-pkg-dir
set dir=/usr
end
add inherit-pkg-dir
set dir=/opt
end
add net
set physical=routerb1
end
add net
set physical=routerb10
end
commit
We don’t have to configure any default router in this sysidcfg even when the system is a router itself. The system boots up with a router and will get it’s routing tables from the RIP protocol.
system_locale=C
terminal=vt100
name_service=none
network_interface=routerb1 {primary hostname=routerb ip_address=10.211.101.254 netmask=255.255.255.0 protocol_ipv6=no default_route=NONE}
network_interface=routerb10 {hostname=routerb-a ip_address=10.211.102.10 netmask=255.255.255.0 protocol_ipv6=no default_route=NONE}
nfs4_domain=dynamic
root_password=cmuL.HSJtwJ.I
security_policy=none
timeserver=localhost
timezone=US/Central
Okay, we can fire up the zone.
# zonecfg -z routerb -f routerb
# zoneadm -z routerb clone template
Cloning snapshot rpool/zones/template@SUNWzone4
Instead of copying, a ZFS clone has been created for this zone.
# cp routerb_sysidcfg /zones/routerb/root/etc/sysidcfg
# cp site.xml /zones/routerB/root/var/svc/profile/
# zoneadm -z routerb boot
Okay, the next zone is the routerc zone. We bind it to the matching vnics in the zone configuration:
create -b
set zonepath=/zones/routerC
set ip-type=exclusive
set autoboot=false
add inherit-pkg-dir
set dir=/lib
end
add inherit-pkg-dir
set dir=/platform
end
add inherit-pkg-dir
set dir=/sbin
end
add inherit-pkg-dir
set dir=/usr
end
add inherit-pkg-dir
set dir=/opt
end
add net
set physical=routerc1
end
add net
set physical=routerc2
end
commit
The same rules as for the routerb apply to the routerc. We will rely on the routing protocols to provide a defaultroute, so we can just insert NONE into the sysidcfg for the default route.
# cat routerc_sysidcfg
system_locale=C
terminal=vt100
name_service=none
network_interface=routerc1 {primary hostname=routerb ip_address=10.211.102.254 netmask=255.255.255.0 protocol_ipv6=no default_route=NONE}
network_interface=routerc2 {hostname=routerb-a ip_address=10.211.100.254 netmask=255.255.255.0 protocol_ipv6=no default_route=NONE}
nfs4_domain=dynamic
root_password=cmuL.HSJtwJ.I
security_policy=none
timeserver=localhost
timezone=US/Central
Okay, i assume you already know the following steps. It’s just the same just with other files.
# zonecfg -z routerc -f routerC
# zoneadm -z routerc clone template
Cloning snapshot rpool/zones/template@SUNWzone4
Instead of copying, a ZFS clone has been created for this zone.
# cp routerb_sysidcfg /zones/routerC/root/etc/sysidcfg
# cp site.xml /zones/routerC/root/var/svc/profile/
# zoneadm -z routerc boot
Okay, this is the last zone configuration in my tutorial. It’s the zone for serverc:
create -b
set zonepath=/zones/serverC
set ip-type=exclusive
set autoboot=false
add inherit-pkg-dir
set dir=/lib
end
add inherit-pkg-dir
set dir=/platform
end
add inherit-pkg-dir
set dir=/sbin
end
add inherit-pkg-dir
set dir=/usr
end
add inherit-pkg-dir
set dir=/opt
end
add net
set physical=serverc1
end
commit
Again ... no defaultroute ... as this is a single-interface system we leave it to the ICMP Router Discovery Protocol to find the routers. So create a file called serverC.
system_locale=C
terminal=vt100
name_service=none
network_interface=serverc1 {primary hostname=server2 ip_address=10.211.102.11 netmask=255.255.255.0 protocol_ipv6=no default_route=NONE}
nfs4_domain=dynamic
root_password=cmuL.HSJtwJ.I
security_policy=none
timeserver=localhost
timezone=US/Central
Well ... it’s zone startup time again ...
# zonecfg -z serverc -f routerC
# zoneadm -z serverc clone template
Cloning snapshot rpool/zones/template@SUNWzone4
Instead of copying, a ZFS clone has been created for this zone.
# cp serverc_sysidcfg /zones/serverC/root/etc/sysidcfg
# cp site.xml /zones/serverC/root/var/svc/profile/
# zoneadm -z serverC boot
So at first we have to make routers out of our routing zones. Obviously we have to login into the both routing zones and activating forwarding and routing. At first on routerb:
# routeadm -e ipv4-forwarding
# routeadm -e ipv4-routing
# routeadm -u
Afterwards on routerc. The command sequence is identical.
# routeadm -e ipv4-forwarding
# routeadm -e ipv4-routing
# routeadm -u
Now lets login into the console of our server:
servera# netstat -nr
Routing Table: IPv4
  Destination           Gateway           Flags  Ref     Use     Interface
-------------------- -------------------- ----- ----- ---------- ---------
default              10.211.100.10        UG        1          0 vnic2
default              10.211.100.254       UG        1          0 vnic2
10.211.100.0         10.211.100.11        U         1          0 vnic2
127.0.0.1            127.0.0.1            UH        1         49 lo0
As you see, there are two default routers in the routing table. The host receives router advertisments from two routers, thus it adds both into the routing table. Now let’s have a closer at the routing table of the routerb system.
routerb# netstat -nr
Routing Table: IPv4
  Destination           Gateway           Flags  Ref     Use     Interface
-------------------- -------------------- ----- ----- ---------- ---------
default              10.211.101.10        UG        1          0 routerb1
10.211.100.0         10.211.102.254       UG        1          0 routerb10
10.211.101.0         10.211.101.254       U         1          0 routerb1
10.211.102.0         10.211.102.10        U         1          0 routerb10
127.0.0.1            127.0.0.1            UH        1         23 lo0
This system has more than one devices. Thus the in.routed starts up as a RIP capable routing daemon. After a short moment the in.routed has learned enough about the network and adds it’s routing table to the kernel. And after a short moment the routing tables of our router are filled with the routing informations provided by the routing protocols.
Conclusion
The scope of the virtualisation with crossbow part is wider than just testing. Imagine the following situation: You want to consolidate several servers in a complex networks, but you want or you cant change a configuration file. In regard of the networking configuration you just could simulate it in one machine. And as it’s part of a single operating system kernel it is a very efficent way to do it. You don’t need virtual I/O servers or something like that. It’s the single underlying kernel of Solaris itself doing this job. Another interesting use case for Crossbow was introduced by Glenn Brunette in his concept for the immutable service containers[^20]
Bandwidth Limiting
Demo environment
I did the demonstration in a simple test environment. a340 is workstation under my desk connected with Gigabit Ethernet to an Airport Extreme (AE) in bridging mode. The system has the ip address 192.168.178.109 and works as a server in this demo. It’s a basic OpenSolaris 2009.06 installation with installed apache22-packages. a330 is a notebook connected via 802.11n to the same AE and it’s used as the client.
The rationale for bandwitdth limiting
One of the basic objects in the new Crossbow stack is the flow. Any network traffic is separated into such flows. And with this flows you can do several interesting things. In this article i want to present two usages of them: Bandwidth Limiting and Flow Accounting
Of course, most of the times you want to transport data as fast as possible. But there are situations, where you want to limit the amount of network traffic. Let’s assume you provider shared hosting on a platform and you want to sell certain service levels. For example a service level with unlimited bandwidth, one with 2 MBit/s per second and one with 8 MBit/s. If you don’t have any mechanism to limit the bandwidth, anybody would just order the 2 MBit/s service as she or he get unlimited bandwidth in any case.
Configuring bandwidth limiting
Let’s measure the unlimited traffic at first to have a baseline for testing the limited transmissions.
jmoekamp@a330:/tmp$ curl -o test1 http://192.168.178.109/random.bin
% Total    % Received % Xferd  Average Speed   Time    Time     Time  Current
                                 Dload  Upload   Total   Spent    Left  Speed
100 5598k  100 5598k    0     0  6433k      0 --:--:-- --:--:-- --:--:-- 6464k
As you see we are able to download the data 6464 Kilobyte per second. Okay, let us impose a limit for the http server. At first we create a flow that matches on webserver traffic.
jmoekamp@a340:~# flowadm add-flow -l e1000g0 -a transport=tcp,local_port=80 httpflow
When you dissect this flow configuration you get to the following ruleset:
-
the traffic is on the ethernet interface
e1000g0 -
it is
tcptraffic -
the local port is
80 -
for future reference the flow is called
httpflow
With flowadm show-flow we can check the current configuration of flows on our system.
jmoekamp@a340:~# flowadm show-flow
FLOW        LINK        IPADDR                         PROTO  PORT    DSFLD
httpflow    e1000g0     --                             tcp    80      --
This is just the creation of the flow. To enable the bandwidth limiting we have to set some properties on this flow. To limit the traffic we have to use the maxbw property. For our first test, we set it to 2 Megabit/s:
jmoekamp@a340:~# flowadm set-flowprop -p maxbw=2m httpflow
A quick check, if we did everything correct:
jmoekamp@a340:~# flowadm show-flowprop
FLOW         PROPERTY        VALUE          DEFAULT        POSSIBLE
httpflow     maxbw               2          --             2m
httpflow     priority        --             --
Now i use my laptop as a test client and download the file again:
jmoekamp@a330:/tmp$ curl -o test1 http://192.168.178.109/random.bin
  % Total    % Received % Xferd  Average Speed   Time    Time     Time  Current
                                 Dload  Upload   Total   Spent    Left  Speed
100 5598k  100 5598k    0     0   265k      0  0:00:21  0:00:21 --:--:--  266k
As you see ... 266 Kilobyte per second that’s, roughly 2 MBit/s. Okay, now we try 8 Megabit/s as a limit:
jmoekamp@a340:~# flowadm set-flowprop -p maxbw=8m httpflow
We check again for the properties of the httpflow
jmoekamp@a340:~# flowadm show-flowprop
FLOW         PROPERTY        VALUE          DEFAULT        POSSIBLE
httpflow     maxbw               8          --             8m
httpflow     priority        --             --
Okay, a quick test again:
jmoekamp@a330:/tmp$ curl -o test1 http://192.168.178.109/random.bin
  % Total    % Received % Xferd  Average Speed   Time    Time     Time  Current
                                 Dload  Upload   Total   Spent    Left  Speed
100 5598k  100 5598k    0     0   936k      0  0:00:05  0:00:05 --:--:--  933k
Okay, we yield 933 Kilobyte/s. That’s a little bit less than 8 Mbit/s
Accouting
Okay, all the traffic in Crossbow is separated in flows (when it’s not part of a configured flow, it’s part of the default flow). It would be nice to use this flow information for accounting. Before doing the testing i activated the accounting with the following command line:
jmoekamp@a340:~# acctadm -e extended -f /var/log/net.log net
Now i can check for bandwidth usage. For example when i want to know the traffic usage between 18:20 and 18:24 on June 20th 2009 i can use the flowadm show-usage account you yield this data from the file i’ve configured before (in my case /var/log/net.log
jmoekamp@a340:~#  flowadm show-usage -s 06/20/2009,18:20:00
-e 06/20/2009,18:24:00 -f /var/log/net.log
FLOW         START         END           RBYTES   OBYTES   BANDWIDTH
httpflow     18:20:27      18:20:47      0        0            0 Mbps
httpflow     18:20:47      18:21:07      0        0            0 Mbps
httpflow     18:21:07      18:21:27      104814   6010271      2.446 Mbp
httpflow     18:21:27      18:21:47      0        0            0 Mbps
httpflow     18:21:47      18:22:07      0        0            0 Mbps
httpflow     18:22:07      18:22:27      0        0            0 Mbps
httpflow     18:22:27      18:22:47      0        0            0 Mbps
httpflow     18:22:47      18:23:07      0        0            0 Mbps
httpflow     18:23:07      18:23:27      121410   5333673      2.182 Mbp
httpflow     18:23:27      18:23:47      15246    676598   0.276 Mbps
The capability to do accounting on a per flow basis makes this feature really interesting even when you don’t want to configure a traffic limit. So i configured an additional flow for SMTP traffic and now the accounting is capable to separate between the HTTP and the SMTP traffic:
jmoekamp@a340:~# flowadm show-flow -s
FLOW            IPACKETS   RBYTES   IERRORS    OPACKETS     OBYTES       OERRORS
httpflow        1168       77256    0          4204         6010271      0
smtpflow        18         1302     0          13           1250         0